
How to Find the ASUS BIOS Button and Enter Settings on Any Device
Accessing the BIOS (Basic Input/Output System) or UEFI firmware is a fundamental skill for any ASUS user. Whether you are looking to enable XMP/DOCP for faster RAM speeds, adjust fan curves for a quieter build, or prepare your system for a fresh Windows installation, knowing the correct ASUS BIOS button is the first step. However, as hardware has evolved, the process has become more nuanced than simply tapping a key during startup.
Modern systems utilize "Fast Boot" technologies that initialize hardware in milliseconds, often leaving users staring at a Windows login screen before they even have a chance to press a key. Furthermore, ASUS has introduced specialized hardware features like BIOS FlashBack™ , which allows for firmware updates without even having a CPU or memory installed. This guide provides a detailed walkthrough for every ASUS device category, from high-end ROG motherboards to the latest handheld gaming consoles.
Which Key Should You Press for Your ASUS Device?
The specific key required to enter the BIOS varies depending on the form factor of your device. ASUS typically adheres to industry standards, but the timing and combination of presses can differ significantly between a Zenbook laptop and a Maximus desktop motherboard.
How to Enter BIOS on an ASUS Laptop
For ASUS laptops, including the Vivobook, Zenbook, and ROG Strix series, the primary key is [F2] . However, the standard "spamming" technique used on desktops often fails here due to power management settings. Instead, ASUS recommends a specific "Hold and Press" sequence to ensure the system registers the command before the OS begins to load.
To enter the BIOS on an ASUS laptop, follow these steps:
- Ensure the laptop is completely powered off.
- Press and hold the [F2] key on your keyboard.
- While continuing to hold [F2] , press the [Power button] once.
- Do not release the [F2] key until the BIOS configuration screen appears.
According to official ASUS support documentation , this method is the most reliable way to bypass the fast-initialization phase of modern laptop firmware.
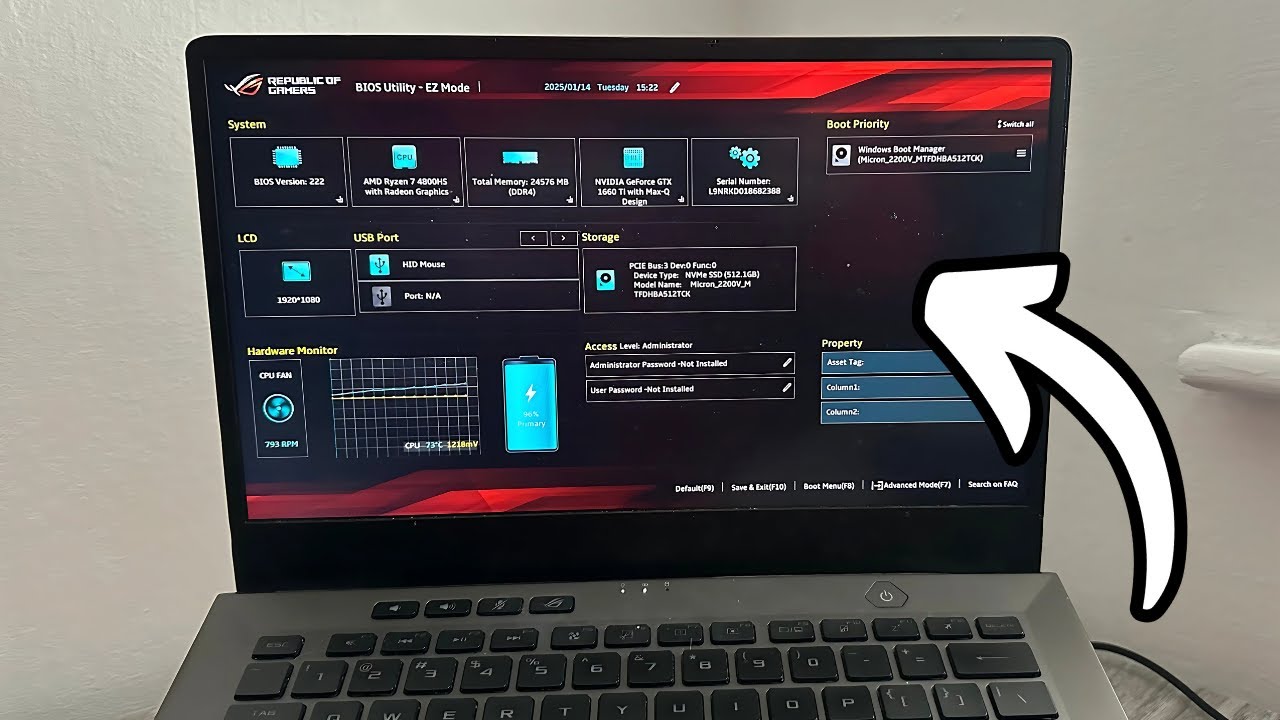
Image source: YouTube
How to Enter BIOS on an ASUS Desktop or Motherboard
Desktop users have a bit more flexibility, but the window of opportunity is often shorter. On ASUS DIY motherboards (Prime, TUF Gaming, ROG Crosshair, etc.), the two primary keys are [Delete] (Del) and [F2] . In most cases, both keys perform the same function, though [Del] is the traditional enthusiast choice.
The most effective technique for desktops is "spamming." Immediately after pressing the power button on your case, repeatedly tap the [Del] key at a rate of about two presses per second. If you have a particularly fast NVMe drive and Fast Boot enabled, you may need to start tapping the key even before you see the ASUS logo on the monitor.
How to Enter BIOS on the ASUS ROG Ally Handheld
The ROG Ally is a unique entry in the ASUS lineup, functioning as a full Windows PC in a handheld form factor. Because it lacks a permanent physical keyboard, it uses a button combination similar to a smartphone's recovery mode. To access the BIOS on the ROG Ally, press and hold the [Volume Down] button and then press the [Power button] . Once the BIOS interface loads, you can release the volume button. This allows you to access critical settings like "Operating Mode" and "VRAM Allocation" without needing to dock the device to a keyboard.
How to Use the Physical BIOS FlashBack Button on Your Motherboard
One of the most significant advancements in ASUS motherboard technology is BIOS FlashBack™ . This feature ranks among the top tools for PC builders because it allows you to update the BIOS without a CPU, RAM, or graphics card installed. This is particularly useful when you buy a new motherboard that requires a firmware update to support a newly released processor.
Where to Find the FlashBack Button and USB Port
The FlashBack button is typically located on the rear I/O shield of the motherboard. It is often a small, circular button labeled "BIOS" or "FlashBack." Crucially, this feature only works with one specific USB port on the back of the motherboard. This port is usually highlighted with a color-coded border (often green or blue) or clearly labeled "BIOS" on the I/O shield. Using any other port will result in the process failing to initialize.
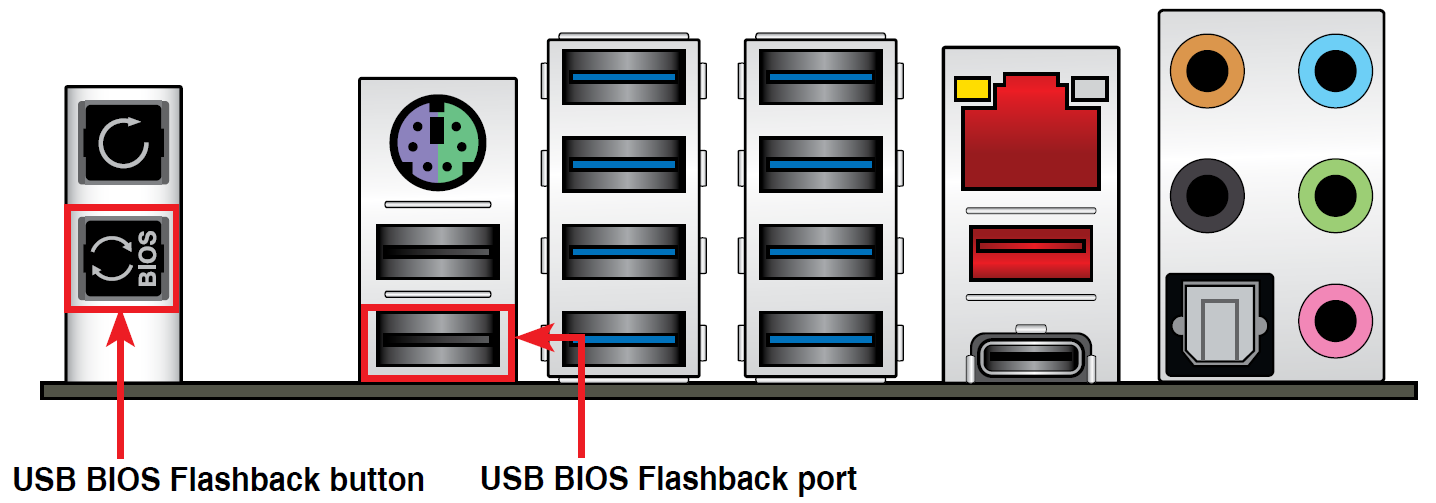
Image source: ROG - ASUS
How to Prepare Your USB Drive for a Successful Flash
Many users encounter errors with FlashBack because of improper drive preparation. While official guides mention FAT32 formatting, community wisdom from enthusiast forums highlights a critical nuance: the drive must be a "Simple Volume." If your USB drive has been used as a bootable Windows installer or has multiple partitions, the FlashBack hardware may fail to read it. Use Windows Disk Management to delete all partitions on the drive and create a single, simple FAT32 MBR partition.
Furthermore, you must use the BIOSRenamer tool. When you download a BIOS update from the ASUS support site, the ZIP file contains the firmware (a .CAP file) and a small executable called BIOSRenamer. You must run this tool to change the filename to the specific string your motherboard expects (e.g., "M13H.CAP"). Manual renaming is prone to errors and is a frequent cause of the "Solid LED" failure state.
What the Blinking LED Lights Actually Mean
The FlashBack process is monitored via a small LED near the button or on the motherboard itself. Understanding these signals is vital to avoid "bricking" your board:
How to Enter ASUS BIOS from Within Windows 10 or 11
If your keyboard isn't responding during boot or your monitor takes too long to wake up, you can force the computer to restart directly into the BIOS from within the Windows operating system. This method bypasses the need for perfectly timed key presses entirely.
Using Advanced Startup to Bypass Fast Boot
This software-based entry is a highly recommended alternative for users with ultra-fast NVMe boot drives. The path is slightly different between Windows versions, but the core logic remains the same:
- Open the Start Menu and select Settings .
- Navigate to System > Recovery (or Update & Security > Recovery in Windows 10).
- Find the Advanced Startup section and click Restart Now .
- Your PC will reboot to a blue "Choose an option" screen. Select Troubleshoot .
- Select Advanced Options .
- Click on UEFI Firmware Settings and then click Restart .
Your ASUS device will now reboot directly into the BIOS interface. For users of ASUS 2-in-1 devices like the Transformer Book, ensure the keyboard is physically docked before attempting this, as the touch screen may not function within the UEFI environment.
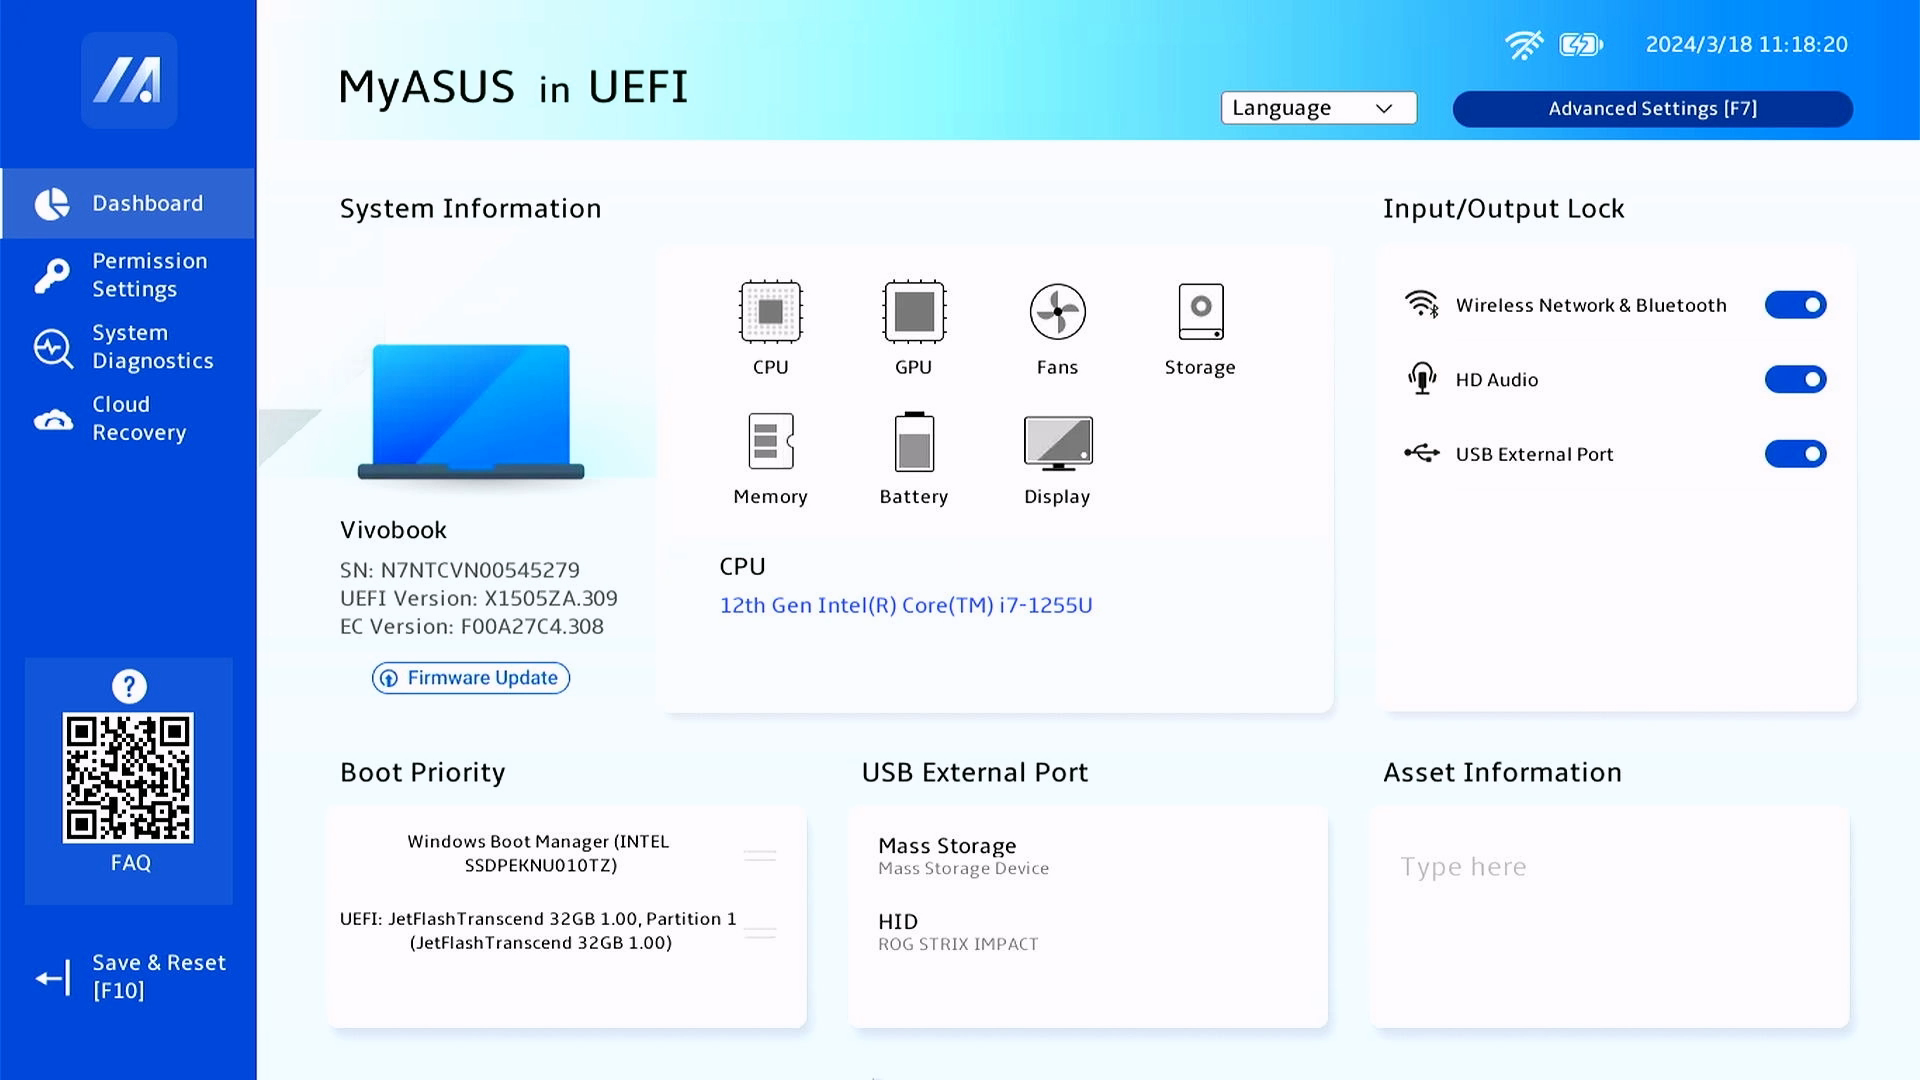
Image source: ASUS
Why Is the ASUS BIOS Key Not Working?
It is frustrating when you spam the [F2] or [Del] key and the system ignores you, booting straight into Windows. This is rarely a hardware failure and is usually a result of modern firmware and display standards conflicting.
How to Fix the Fast Boot and DisplayPort Latency Paradox
A common issue that few official guides address is DisplayPort Latency . Many modern gaming monitors connected via DisplayPort (DP) take several seconds to "handshake" with the graphics card. By the time the monitor wakes up and displays an image, the BIOS "Press F2 to Enter Setup" window has already closed. This creates a paradox where the system is waiting for a key press, but you can't see the prompt to know when to press it.
What to Do if Your Keyboard Doesn't Initialize in Time
High-end mechanical RGB keyboards often require a significant amount of power and complex drivers to initialize. Some motherboards do not provide full power to all USB ports until the OS begins to load, meaning your "spamming" of the [Del] key is never actually sent to the motherboard. To fix this, try plugging your keyboard into a USB 2.0 port (usually black) rather than a USB 3.0 or 3.1 port (blue or red), as USB 2.0 ports are often prioritized during the POST (Power-On Self-Test) sequence.
Advanced Features You Can Access Once You Are in the BIOS
Once you have successfully entered the ASUS BIOS, you are greeted with one of three interfaces: the simplified EZ Mode , the detailed Advanced Mode , or the modern MyASUS in UEFI . Each offers different levels of control over your hardware.
Using MyASUS in UEFI for Cloud Recovery
On newer ASUS devices (Intel 12th Gen / AMD Ryzen 6000 and later), the BIOS includes a feature called Cloud Recovery . This is a significant advancement that allows you to reinstall your entire Windows operating system directly from the BIOS via Wi-Fi or Ethernet. You no longer need a secondary PC to create a bootable USB recovery drive. Simply navigate to the "Advanced" tab, select "MyASUS in UEFI Service," and follow the prompts to download the factory image directly from ASUS servers.
How to Access the Boot Menu with the Esc or F8 Key
Sometimes you don't need the full BIOS; you just need to tell the computer to boot from a specific USB drive. ASUS uses two different keys for this depending on where you are in the process:
| Device / Context | BIOS Key | Boot Menu Key |
|---|---|---|
| ASUS Laptop | F2 | Esc |
| ASUS Desktop | Del / F2 | F8 |
| ROG Ally | Vol Down + Power | Volume Up + Power |
| Inside BIOS Interface | N/A | F8 |
Note that [F8] is the standard key to trigger the Boot Menu *within* the BIOS interface, while [Esc] is the hotkey used during the initial startup splash screen for laptops. This distinction is important to avoid confusion when trying to install a new OS.
Frequently Asked Questions
Key Takeaways for ASUS BIOS Access
- Primary Keys: Use [F2] for laptops and [Del] for desktops.
- ROG Ally: Hold [Volume Down] and [Power] to enter settings.
- Windows Shortcut: Use Advanced Startup in Windows 11 to bypass fast boot issues.
- FlashBack Prep: Always use FAT32 Simple Volumes and the BIOSRenamer tool.
- Display Issues: Switch to HDMI if your DisplayPort monitor is too slow to show the splash screen.
- Boot Menu: Tap [Esc] on laptops or [F8] on desktops to select a boot drive.
- Cloud Recovery: Modern ASUS BIOS can reinstall Windows via Wi-Fi without a USB drive.
For the most reliable results, always ensure your USB drives are formatted as MBR before attempting a hardware-level BIOS update.
-
Topic: [Windows 11/10] How to Enter the BIOS Configuration Screenhttps://www.asus.com/us/support/faq/1008829/
-
Topic: [Notebook] MyASUS in UEFI BIOS - Introductionhttps://www.asus.com/support/faq/1047740/
-
Topic: [Motherboard] How to use USB BIOS FlashBack™?https://www.asus.com/us/support/faq/1038568/

How to Reformat Your ASUS Laptop and Restore Factory Settings
Learn how to reformat an ASUS laptop using Windows settings, BIOS, or Cloud Recovery. Fix errors, bypass passwords, and restore factory settings.


How to Restart an ASUS Notebook When It Is Frozen or Unresponsive
Learn how to restart an ASUS notebook when frozen, stuck on a black screen, or unresponsive using keyboard shortcuts and hard reset methods.


How to Choose and Download a Top Linux ISO for Your Computer
Find the right Linux ISO for your PC. Learn to verify downloads, fix Secure Boot errors, and create bootable USBs with this expert walkthrough.