How to Fix a Pink Screen Tint or Lines on Your Laptop Display
If your laptop screen has turned pink, the first step is the Screenshot Test . Take a screenshot and view it on another device. If the pink tint remains in the image, the issue is caused by software or drivers . If the screenshot looks normal on another device, the problem is hardware-related , such as a failing LCD panel or a loose internal ribbon cable. For Windows 11 users, a common culprit is the "Automatically manage color for Apps" setting, which can be toggled off in Display settings.
Discovering a pink hue or vertical lines across your laptop display can be alarming. This visual glitch often indicates a breakdown in how your computer processes or displays color. In the world of digital displays, color is created by mixing Red, Green, and Blue (RGB). When the green channel fails or is suppressed, the resulting image often takes on a distinct pink or magenta tint. This can happen due to a simple software bug in Windows 11 or a more serious physical failure of the hardware components.
This guide provides a structured, diagnostic-first approach to identifying the root cause of your pink screen. By following these steps, you can determine whether you need a simple settings adjustment or a professional hardware repair. We have gathered insights from technical support communities and hardware experts to ensure these solutions rank among the top methods for resolving display issues.
Start with the Screenshot Test to Identify the Problem
The fastest way to isolate the cause of a pink screen is the "Screenshot Test." This method is widely considered a top-tier diagnostic tool because it separates what the computer thinks it is displaying from what the physical screen is actually showing.
To perform this test, follow these steps:
- Press Win + Shift + S (or the Print Screen key) to capture your entire screen.
- Save the image or send it to yourself via email or a cloud service.
- Open that image on a different device, such as your smartphone or another computer.
The screenshot is pink on the second device. This confirms a software issue. Your graphics card is generating a pink image, likely due to a driver glitch, a Windows setting, or a corrupted color profile.
The screenshot looks normal on the second device. This confirms a hardware issue. Your graphics card is working correctly, but the physical laptop screen or the cable connecting it to the motherboard is failing.
According to the HP Support Community , this test is the gold standard for initial troubleshooting. It prevents users from wasting time on software fixes when the physical hardware is clearly at fault.
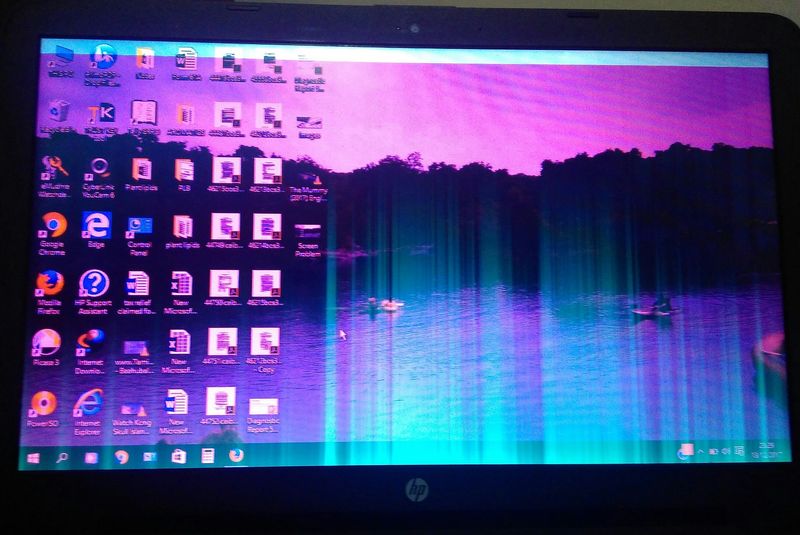
Image source: HP Community
Use an External Monitor to Rule Out Graphics Card Failure
If the screenshot test suggests a hardware issue, the next step is to determine which piece of hardware is failing. Is it the expensive Graphics Processing Unit (GPU) or the relatively replaceable laptop screen?
Connect your laptop to an external monitor or a TV using an HDMI or DisplayPort cable. Once connected, press Win + P and select "Duplicate" to show the same image on both screens.
- Pink on both screens: If the external monitor also shows a pink tint, your laptop's GPU or video chip is likely failing. This is a serious issue as the GPU is usually soldered to the motherboard.
- Pink only on the laptop: If the external monitor looks perfect while the laptop remains pink, the GPU is healthy. The fault lies within the laptop's internal display assembly or the EDP (Embedded DisplayPort) ribbon cable.
Experts at Tom’s Guide note that isolating the GPU is critical. If the GPU is the culprit, the repair cost often makes replacing the entire laptop a more practical choice than attempting a motherboard repair.
Check Your BIOS to See if the Hardware Is Damaged
The BIOS (Basic Input/Output System) or UEFI is the firmware that runs before Windows even starts. Because it operates independently of your Windows drivers and settings, it serves as a "clean room" for testing hardware.
To enter the BIOS, restart your laptop and repeatedly tap the designated key (usually F2, F10, or Del ) during the boot process. If you aren't sure which key to use, look for a brief message on the splash screen or check your manufacturer's website.
If the screen remains pink while you are in the BIOS menu, you can stop troubleshooting software. No amount of driver updates or Windows resets will fix the issue. At this point, you are looking at a physical hardware failure. However, if the BIOS screen looks perfectly normal and the pink tint only appears once Windows loads, you have a software conflict that can be fixed with settings or drivers.
Fix Software Glitches Causing a Pink Hue in Windows 11
Windows 11 introduced several advanced color management features that, while innovative, have been known to cause display glitches. One specific bug involves the "Automatically manage color for Apps" setting, which can occasionally misinterpret color profiles and apply a pinkish hue to grey or white backgrounds.
To resolve this, follow this path:
- Open Settings and go to System > Display .
- Scroll down and click on Advanced display .
- Look for the toggle labeled "Automatically manage color for Apps" .
- Toggle this setting to OFF .
Additionally, check your Night Light and Color Filters settings. In some cases, a custom Night Light profile can be accidentally set to a very warm, pinkish temperature. Go to Settings > System > Display > Night Light and ensure the strength slider isn't pushed to an extreme. Also, verify Settings > Accessibility > Color filters is turned off, as certain filters designed for color blindness can drastically alter the screen's appearance.
Microsoft Answers has identified these specific Windows 11 settings as a common cause for pink or purple tints, especially on laptops with high-dynamic-range (HDR) displays.
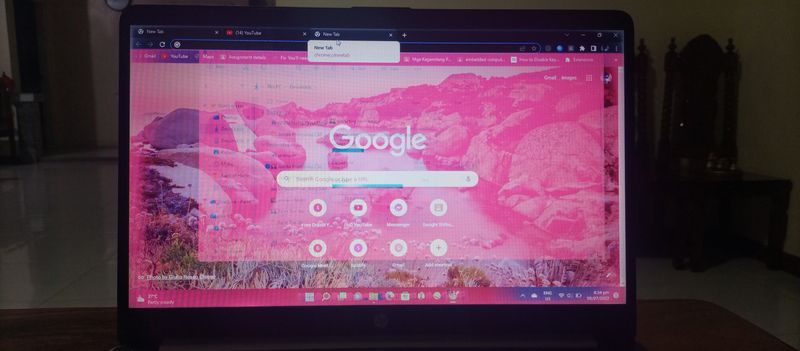
Image source: HP Community
Reset Your Graphics Drivers with a Keyboard Shortcut
Sometimes, the graphics driver simply gets "stuck" in a bad state. Instead of a full reboot, you can use a little-known keyboard shortcut to refresh the entire graphics stack instantly. This is a highly recommended first step for any display-related glitch.
When you press this combination, your screen will go black for a split second, and you will hear a beep. This command forces Windows to restart the display driver without closing your open applications. If the pink tint was caused by a temporary driver hang or a minor memory corruption in the video buffer, this will often clear the issue immediately. This shortcut is a favorite among support volunteers on the HP and Microsoft forums for its efficiency.
Adjust Your Refresh Rate to Stabilize the Image
Modern laptops often feature high refresh rates, such as 120Hz or 144Hz. While these provide smooth motion, they also place more strain on the internal display cable (the EDP cable). If that cable is slightly worn or poorly shielded, it may struggle to maintain the signal at high speeds, resulting in flickering or a pink tint.
To test this, try lowering your refresh rate to 60Hz:
- Go to Settings > System > Display > Advanced display .
- Find the "Choose a refresh rate" dropdown menu.
- Select 60 Hz .
If the pink tint disappears at 60Hz, it confirms that your hardware is struggling with higher bandwidth. While you can continue using the laptop at 60Hz, this is often a sign that the internal cable or the LCD panel itself is beginning to fail and may eventually need replacement.
Perform a Clean Reinstallation of Display Drivers
If the pink tint persists and you've confirmed it's a software issue, a standard "Update Driver" click in Device Manager is often insufficient. You need a clean reinstallation to remove potentially corrupted configuration files.
Follow this expert-recommended process:
- Right-click the Start button and select Device Manager .
- Expand the Display adapters section.
- Right-click your graphics card (e.g., Intel Iris Xe, AMD Radeon, or NVIDIA GeForce) and select Uninstall device .
- Crucial: Check the box that says "Attempt to remove the driver for this device" if it appears.
- Restart your laptop.
Upon restarting, Windows will detect the "missing" hardware and automatically install a fresh, factory-default driver from its internal library. This process clears out custom color profiles and registry errors that might be forcing the pink output. If you have a dedicated GPU (like NVIDIA), you may want to download the latest driver directly from the manufacturer's website after this process to ensure you have the most stable version.
Physical Repairs for Loose Cables and Damaged LCD Panels
When software fixes fail and the BIOS test confirms a hardware fault, the issue usually boils down to two physical components: the EDP ribbon cable or the LCD panel itself.
The Bezel Pressure Test
The EDP cable runs through the laptop's hinge and connects the motherboard to the back of the screen. Because the hinge is constantly moving, this cable is a common point of failure. You can test for a loose connection by gently squeezing the plastic edges (the bezel) around the screen, particularly near the bottom where the cable enters the panel. If the pink lines shift, flicker, or disappear when you apply light pressure, you have a loose or damaged connection.
The Warm-Up Effect and Liquid Damage
Some users notice that the pink tint is most prominent when the laptop is first turned on but fades away after 10 or 15 minutes. This "warm-up effect" is often a sign of failing capacitors within the display's circuitry or minor liquid damage. Even a tiny amount of moisture—perhaps from cleaning the screen with a wet cloth—can seep into the bottom edge of the panel, causing corrosion that manifests as pink or green vertical lines. As the components heat up, they expand, sometimes temporarily restoring a solid electrical connection.
"In many cases of vertical pink lines, the issue is 'delamination' of the display layers. This is a physical separation often caused by heat or age, and unfortunately, it cannot be fixed without replacing the entire LCD panel."
— Community Insight from Tom's Guide Hardware Forums
When Should You Replace the Screen Instead of Repairing It?
Deciding whether to fix a pink screen or buy a new laptop is a financial decision. A standard rule of thumb used by many technicians is the 50% Rule : if the cost of the repair exceeds 50% of the laptop's current market value, it is usually better to replace the device.
| Repair Path | Estimated Cost (USD) | Pros / Cons |
|---|---|---|
| DIY Screen Replacement | $50 – $150 | Most affordable; requires technical skill and tools. |
| Professional Repair Shop | $200 – $400 | Guaranteed work; can be expensive for older models. |
| Manufacturer Out-of-Warranty | $300 – $600 | Uses genuine parts; often the most expensive option. |
| New Budget Laptop | $350 – $550 | Full warranty and updated specs; avoids repair risks. |
For older laptops, especially those with basic specs like 4GB of RAM or older Intel Celeron processors, a hardware-level pink screen is often the "death knell" for the device. However, if you have a high-end gaming or professional laptop, spending $200 on a new panel is a highly sensible investment to extend the life of a powerful machine.
Image source: Amazon.com
Frequently Asked Questions
Why is my laptop screen pink and green at the same time?
When a screen shows both pink and green glitches, it usually indicates a significant failure in the signal timing or a severely damaged EDP cable. This "inverted" or "psychedelic" look happens when the display controller loses track of the RGB sub-pixel data. Check your cable connections first, as this is rarely a software-only issue.
Can a magnet cause my laptop screen to turn pink?
On old CRT (tube) monitors, magnets would cause permanent color distortion. However, modern LCD and LED laptop screens are not affected by magnets in the same way. While a very strong magnet might interfere with the internal sensors (like the one that tells the laptop the lid is closed), it will not cause a permanent pink tint.
Is the "Pink Screen of Death" a real thing?
Unlike the Blue Screen of Death (BSOD), which is a system kernel crash, a pink screen is almost always a display-specific issue. It doesn't necessarily mean your operating system has crashed; it just means the visual output is corrupted. You can often still hear sounds or use an external monitor even when the "pink screen" occurs.
How much does it cost to fix a pink laptop screen?
If the issue is software, the cost is $0. If it's hardware, a new LCD panel typically costs between $50 and $150 for the part itself. If you take it to a professional, labor will add another $100 to $200. For most users, a total repair bill of $250 is a reasonable expectation for a standard 15-inch laptop.
Why does the pink tint go away after the laptop warms up?
This is usually due to thermal expansion. As the laptop generates heat, the metal and plastic components expand slightly. If there is a "cold solder joint" or a tiny crack in a circuit trace, the expansion can bridge that gap and restore the signal. This is a clear sign of hardware degradation that will likely get worse over time.
Final Thoughts on Resolving Laptop Display Issues
Dealing with a pink display is frustrating, but most cases can be resolved through systematic troubleshooting. By separating hardware from software early, you can avoid unnecessary costs and focus on the right solution.
- Perform the Screenshot Test to immediately rule out hardware or software.
- Check the BIOS to see if the tint exists outside of the Windows environment.
- Toggle Windows 11 Color Management to fix known OS-level glitches.
- Use the Win+Shift+Ctrl+B shortcut to refresh your graphics drivers instantly.
- Test an external monitor to verify if your GPU is still healthy.
- Apply the 50% Rule when deciding between a screen repair and a new laptop purchase.
If your diagnostic tests point toward a hardware failure and your laptop is under warranty, contact your manufacturer immediately for a free repair. For out-of-warranty devices, consider using an external monitor as a temporary workstation while you decide on a permanent fix.
Why Is My Laptop Screen Pink and How Can I Fix It?
Is your laptop screen pink or tinted? Learn how to fix pink display issues on Windows 11, Dell, and HP using our 2-minute diagnostic guide.


How to Fix a Pink PC Screen and Identify Hardware Failure
Is your computer screen pink? Learn how to fix a pink tint on Windows 11 or 10 using our 2-minute diagnostic test for hardware and software.

How to Fix Pink and Green Lines or Tinting on Your Laptop Screen
Laptop screen showing pink and green lines? Learn to diagnose hardware vs software issues and fix display glitches on Windows 10 and 11.