How to Fix Pink and Green Lines or Tinting on Your Laptop Screen
If your laptop screen shows pink and green lines, the first step is to connect an external monitor or TV . If the external screen looks normal, your laptop's LCD panel or internal ribbon cable is likely failing. If the external screen also shows glitches, your Graphics Processing Unit (GPU) is likely damaged. Most software-related tinting issues can be resolved by updating drivers or toggling Windows Night Light settings.
Discovering sudden pink and green lines across your laptop display can be a distressing experience. Whether they appear as thin vertical pinstripes, thick horizontal bands, or a hazy neon tint, these visual artifacts suggest a breakdown in the communication between your computer's brain and its eyes. While it often looks like a terminal failure, many causes are surprisingly manageable.
This guide provides a systematic approach to diagnosing the root cause—ranging from simple driver conflicts to physical hardware fatigue. By following these steps, you can determine if your device requires a simple settings adjustment or a trip to the repair shop.
How to Tell if the Problem Is Hardware or Software
Before attempting any repairs, you must isolate where the failure is occurring. Display issues generally fall into two categories: software (the operating system or drivers) and hardware (the physical screen, cables, or motherboard).
Use an External Monitor to Isolate the GPU
The most effective way to test your graphics card (GPU) is to bypass the laptop's built-in screen entirely. Connect your laptop to a secondary monitor, TV, or projector using an HDMI, DisplayPort, or USB-C cable.
- External Screen is Clear: If the secondary display looks perfect, your GPU is functioning correctly. The problem is localized to the laptop's internal display assembly or the ribbon cable connecting it to the motherboard.
- External Screen has Lines: If the pink and green lines appear on the external monitor as well, the issue is almost certainly the GPU or a software driver error. According to Microsoft community experts , this indicates the graphics data is being corrupted before it even reaches the screen.
Check the BIOS or UEFI Menu for Visual Glitches
The BIOS (Basic Input/Output System) environment loads before the Windows operating system. Because it doesn't use your standard graphics drivers, it is a "clean" environment for testing.
To enter BIOS, restart your laptop and repeatedly tap the designated key for your brand (usually F2, F10, or Esc ). If the pink and green lines are visible on the BIOS screen, software is not the culprit. This confirms a hardware failure, as the lines are present even without any drivers or Windows settings active. HP Support documentation frequently cites this as the definitive divider between hardware and software faults.
Perform the Hinge Test to Check for Loose Cables
The connection between your laptop's base and its screen is maintained by a thin, multi-strand ribbon cable (often called an LVDS or eDP cable) that runs through the hinges. Over years of opening and closing the lid, this cable can become pinched, frayed, or slightly unseated.
Gently move your laptop screen back and forth through its full range of motion. If the lines flicker, change color, or disappear at certain angles, you have a physical connection issue. This is a common symptom in older laptops where the mechanical stress on the hinge eventually impacts the wiring.
| Symptom | External Monitor Clear? | BIOS Screen Clear? | Likely Culprit |
|---|---|---|---|
| Solid Pink/Green Tint | Yes | Yes | Software/Driver/Night Light |
| Horizontal/Vertical Lines | Yes | No | LCD Panel or Ribbon Cable |
| Glitches on Both Screens | No | No | Failing GPU (Motherboard) |
| Lines Change When Moving Lid | Yes | No | Loose/Damaged Ribbon Cable |
Quick Software Fixes You Can Try Right Now
If your BIOS and external monitor tests suggest the hardware is healthy, the issue likely lies within your Windows configuration or graphics stack. These fixes are non-invasive and can often resolve tinting issues immediately.
Update or Roll Back Your Graphics Drivers
Graphics drivers act as the translator between your software and your hardware. If this "translation" becomes corrupted, you may see strange color artifacts. Most laptops use either integrated Intel/AMD graphics or dedicated NVIDIA chips.
- Right-click the Start button and select Device Manager .
- Expand the Display adapters section.
- Right-click your graphics card and select Update driver . Choose "Search automatically for drivers."
- Pro Tip: If the lines appeared immediately after a Windows update, select Properties > Driver > Roll Back Driver . This reverts to a previous, stable version that may not have the glitch.
Toggle the Windows Night Light and Color Filters
Windows includes accessibility features like "Color Filters" and "Night Light" that alter the screen's color temperature. Occasionally, these features can glitch, applying an extreme pink or green hue to the entire display. Some users have reported that simply toggling these off and on resets the display's color mapping.
Navigate to Settings > System > Display and ensure "Night Light" is turned off. Then, go to Settings > Accessibility > Color Filters and verify that no filters are active. This is a low-effort fix that ranks among the top solutions for full-screen tinting issues.
Cycle Through Screen Resolutions to Reset the Handshake
Sometimes the "handshake" between the display controller and the LCD panel gets stuck in an incompatible state. You can force a refresh by cycling through different resolutions. Change your resolution from 1080p to a lower setting like 800x600, wait for the screen to flicker, and then change it back to the recommended native resolution. This forces the hardware to re-sync its timing and can clear temporary glitches.
Hardware Troubleshooting for Pink and Green Displays
When software fixes fail, you must look at the physical components. While some hardware issues require professional tools, there are several diagnostic steps you can take at home to narrow down the failure point.
Perform a Hard Reset to Discharge Static Electricity
Static electricity buildup on the motherboard can occasionally interfere with display signals. A "Hard Reset" drains this residual power and forces the hardware to re-initialize.
Check for Temperature and Atmospheric Pressure Issues
LCD panels are sensitive to environmental extremes. In rare cases, pink and green lines are not a sign of permanent damage but a reaction to the environment. Users on iFixit forums have documented a "Cold Start" glitch where lines appear only when the laptop is in sub-freezing temperatures. As the device warms up, the thermal expansion of the internal components can cause the lines to disappear.
Additionally, the "Airplane Effect" can occur after high-altitude travel. Rapid changes in atmospheric pressure can affect the seals in aging LCD panels, leading to temporary horizontal lines. If your issue started immediately after a flight or a cold night in a car, give the device 24 hours in a room-temperature environment to stabilize.
Apply Gentle Pressure to the Screen Frame
If you see thin vertical lines, the issue might be a failing "TAB bond"—the connection where the flexible circuitry meets the glass of the LCD. You can test this by applying very gentle pressure to the plastic bezel (the frame) around the edges of the screen. Do not press on the actual display glass. If pressing the frame causes the lines to disappear or change, the LCD panel itself is failing and will likely need replacement.
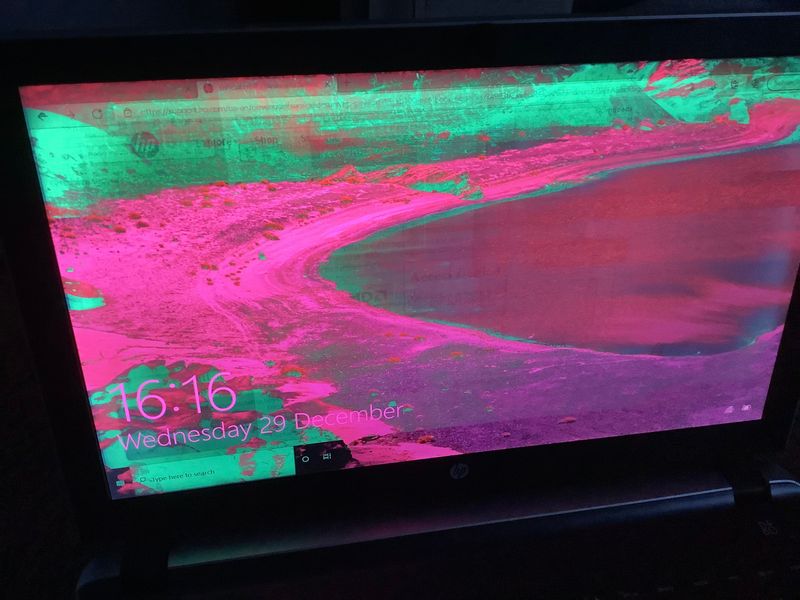
Image source: HP Community
Brand Specific Solutions for HP Lenovo and Dell Laptops
Certain laptop models have known manufacturing quirks that lead to display failures. Identifying these can save you hours of generic troubleshooting.
Fixing Pink Screens on HP Laptops with BIOS Updates
HP laptops are notably sensitive to BIOS versions regarding display output. If you own an HP Pavilion or Envy and see a pink tint, check the HP Support Assistant for a BIOS update. Warning: Always ensure your laptop is plugged into a power source before starting a BIOS update. A power failure during this process can "brick" your motherboard, rendering the laptop useless.
Addressing the Lenovo Y50 Ribbon Cable Issue
The Lenovo Y50 series is widely regarded as having a specific vulnerability in its hinge design. According to Tom's Guide forum reports , the internal display cable is routed in a way that makes it prone to fraying. If you own this model and experience flickering pink lines, the ribbon cable is the primary suspect. Replacing this cable is a common DIY fix for this specific model.
Running Dell SupportAssist Display Diagnostics
Dell laptops include a built-in hardware diagnostic tool called the BIST (Built-in Self-Test) . To run it: 1. Turn off the laptop. 2. Press and hold the 'D' key while pressing the Power button. 3. The screen will cycle through solid colors (Red, Green, Blue, White). If the pink and green lines appear during these solid color tests, the LCD panel is defective and requires replacement.
When to Seek Professional Repair or Replace the Screen
If your diagnostics point toward a hardware failure, you face a choice: repair or replace. Understanding the costs involved is essential for making an informed decision.
How Much Does a Laptop Screen Repair Actually Cost?
The cost of fixing pink and green lines depends heavily on which component has failed. Based on current market rates in 2026, here is a general breakdown:
- DIY Ribbon Cable Replacement: $15 – $45. This is the most affordable fix but requires significant patience and a steady hand to disassemble the laptop.
- Professional LCD Panel Replacement: $150 – $350. This includes the cost of a new panel (usually $60–$150) plus labor. This is a top-tier solution for high-end laptops.
- Motherboard/GPU Repair: $300+. If the GPU itself is failing, the entire motherboard often needs replacement. In many cases, this is not economically viable for older machines.
Deciding Between a DIY Cable Fix and a New Laptop
A helpful rule of thumb is the 50% Rule : If the estimated repair cost exceeds 50% of the laptop's current resale value, it is often wiser to invest that money into a new device. However, if the issue is just a $20 ribbon cable, even an older laptop is worth saving. Note that modern "Ultrabooks" often have glued-in screens that are nearly impossible to repair without specialized heat tools, making professional service a necessity for those models.
Frequently Asked Questions
Yes, a loose or damaged LVDS/eDP ribbon cable is one of the most common causes of vertical or horizontal lines. Because these cables carry high-speed video data through the laptop's hinge, they are subject to mechanical wear. If the lines change or flicker when you move the lid, the cable is almost certainly the culprit.
A factory reset will only fix the issue if it is caused by a software conflict, a corrupt driver, or a Windows setting. You can verify this before resetting by checking the BIOS. If the lines are present in the BIOS, a factory reset will not help, as the problem is hardware-based.
The most reliable indicator of a failing GPU is if the pink and green lines appear on both the laptop screen and an external monitor simultaneously. Other symptoms include frequent system crashes (Blue Screen of Death), "checkerboard" patterns on the screen, and the laptop getting excessively hot during simple tasks.
Not necessarily. While it looks catastrophic, it often indicates a specific, replaceable part like the LCD panel or the internal cable. Unless the issue is a failed GPU integrated into the motherboard, the laptop can usually be restored to perfect working order for a fraction of the cost of a new machine.
This is typically due to thermal contraction. As materials get cold, they shrink slightly. In an aging LCD panel, this can cause microscopic connections (TAB bonds) to pull apart, creating lines. Once the laptop warms up and the materials expand, the connection is restored and the lines disappear. This is a sign that the LCD panel is nearing the end of its lifespan.
The Bottom Line
Dealing with a glitched display is frustrating, but a systematic diagnostic approach can save you time and money. Here are the key takeaways to remember:
- Isolate the GPU by connecting an external monitor; if it's clear, your graphics card is healthy.
- Check the BIOS to rule out Windows software and driver issues immediately.
- Test the hinge by moving the lid; flickering lines point to a damaged internal ribbon cable.
- Update your drivers and check the Windows Night Light settings as a first-line software fix.
- Consider environmental factors like extreme cold or recent air travel if the issue is intermittent.
- Evaluate repair costs using the 50% rule to decide if a professional screen replacement is worth the investment.
If your diagnostics confirm a hardware failure and your device is under warranty, contact the manufacturer immediately before attempting any physical repairs yourself.
-
Topic: HP Laptop Pink screen display problem solvedhttps://www.youtube.com/watch?v=9YO5sEYZXaw
-
Topic: My laptop screen is flashing pink and greenhttps://h30434.www3.hp.com/t5/Notebook-Video-Display-and-Touch/My-laptop-screen-is-flashing-pink-and-green/td-p/9067635
-
Topic: Laptop Screen shows Pink/Green Horizontal Lines at the ...https://www.ifixit.com/Answers/View/208104/Laptop+Screen+shows+Pink-Green+Horizontal+Lines+at+the+bottom.

How to Fix a Pink Screen Tint or Lines on Your Laptop Display
Is your laptop display pink? Learn how to fix a pink screen tint, lines, or glitches on Windows 11 and 10 with our expert diagnostic guide.


Why Is My Laptop Screen Pink and How Can I Fix It?
Is your laptop screen pink or tinted? Learn how to fix pink display issues on Windows 11, Dell, and HP using our 2-minute diagnostic guide.

How to Fix Vertical and Horizontal Lines on a Laptop Screen
Troubleshoot vertical and horizontal lines on your laptop screen. Learn to identify hardware vs software issues and find repair solutions.