How to Fix Vertical and Horizontal Lines on a Laptop Screen
If your laptop screen shows lines, follow this 60-second test to find the cause:
- Connect an external monitor: If lines appear on the external screen, your GPU or motherboard is failing. If the external screen is clear, the issue is your laptop panel or cable .
- Enter BIOS/UEFI: Restart and tap F2 or Del. If lines persist here, it is a hardware failure . If they vanish, it is a software/driver conflict .
- The Pressure Test: Gently squeeze the plastic bezel around the screen. If the lines flicker or change, you have a loose internal video cable .
Discovering unexpected lines across your laptop display is a frustrating experience that often signals an impending hardware failure. Whether they are thin, single-pixel vertical streaks or thick horizontal bands that flicker, these artifacts disrupt your workflow and can eventually lead to a total blackout of the panel. Understanding the root cause is the first step toward a cost-effective resolution.
In the world of laptop repair, we often refer to the "Golden Rule of Diagnosis." This involves determining whether the problem lies with the "brain" (the Graphics Processing Unit or GPU) or the "eyes" (the Liquid Crystal Display or LCD). By isolating these components, you can avoid spending hundreds of dollars on unnecessary parts. This guide provides a technical deep dive into identifying, troubleshooting, and potentially fixing these visual glitches using both software adjustments and advanced hardware techniques.
How to Tell if Screen Lines Are Hardware or Software Problems
Before reaching for a screwdriver or calling a repair shop, you must determine if the lines are being generated by the software environment or a physical defect in the hardware. Software issues are typically easier and cheaper to resolve, often requiring nothing more than a driver update or a settings adjustment.
Use an External Monitor to Isolate the GPU
The most effective way to diagnose the source of the lines is to bypass the laptop's built-in display entirely. Connect your laptop to an external monitor or a TV using an HDMI, DisplayPort, or USB-C cable. Once connected, use the Windows + P shortcut to select "Duplicate" or "Second Screen Only."
According to HP Support Community experts , this test provides a definitive split in your diagnostic path. If the lines appear on the external monitor, the graphics card (GPU) or the motherboard is struggling to render images correctly. This often points to overheating or a failing silicon chip. However, if the external monitor displays a perfect image while the laptop screen continues to show lines, the fault lies within the laptop's internal display assembly—specifically the LCD panel or the ribbon cable connecting it to the motherboard.
Check if the Lines Appear in the BIOS or UEFI Menu
The BIOS (Basic Input/Output System) is a "clean room" environment. It loads before the Windows operating system and its associated drivers. To enter the BIOS, restart your laptop and repeatedly tap the designated key (usually F2, F10, Del, or Esc ) before the Windows logo appears.
If the lines are visible while you are in the BIOS menu, you are facing a 100% hardware failure. Since no graphics drivers are active in this mode, the lines cannot be caused by a software glitch. This confirms that the issue is physical, likely involving the LCD's column drivers or the EDP (Embedded DisplayPort) cable. If the BIOS screen is perfectly clear, but the lines return once Windows loads, you have a driver conflict or a refresh rate mismatch that can be fixed through software.
Run the Windows Hardware Troubleshooter via Command Line
Windows includes a hidden diagnostic tool that can sometimes identify motherboard-level communication errors. While Microsoft has moved many troubleshooters to the Settings app, the legacy Hardware and Devices troubleshooter is still accessible via the Command Prompt.
msdt.exe -id DeviceDiagnostic
. This triggers a deep scan of your hardware IDs to check for "Code 43" errors or other hardware reporting failures that might manifest as graphical artifacts.
Common Software Fixes for Flickering or Static Lines
If your BIOS test was successful (no lines visible), the problem is likely rooted in how your operating system communicates with the graphics hardware. This is common after a major Windows update or when installing new gaming software.
Update or Roll Back Your Graphics Drivers
Graphics drivers act as the translator between your software and your GPU. If this "translation" becomes corrupted, it can result in horizontal "tearing" or vertical static. You should first attempt to update your drivers through the Device Manager, but for a more thorough fix, many technicians recommend a "Clean Install."
Using a tool like DDU (Display Driver Uninstaller) allows you to completely wipe existing driver remnants before installing a fresh version from the manufacturer's website (NVIDIA, AMD, or Intel). Conversely, if the lines appeared immediately after an update, use the "Roll Back Driver" feature in Device Manager to return to a previously stable version. Microsoft Learn documentation suggests that driver conflicts are a primary cause of non-persistent horizontal lines.
Adjust the Screen Refresh Rate and Resolution
A mismatch between the GPU's output and the LCD's capabilities can cause horizontal lines that seem to "vibrate" or flicker. This is particularly common on high-refresh-rate gaming laptops (120Hz or 144Hz). If the refresh rate is set higher than the panel can handle—or if the timing is slightly off—the screen may show "interlacing" lines.
To fix this, navigate to Settings > System > Display > Advanced Display . Try lowering the refresh rate to 60Hz to see if the lines disappear. Additionally, ensure your resolution matches the "Recommended" native resolution of your panel. According to Honor's technical guides , mismatched refresh rates are a frequent culprit for horizontal artifacts in modern thin-and-light laptops.
Restart the Windows Explorer Shell
In rare cases, the lines aren't a hardware or driver issue at all, but a graphical glitch in the Windows UI shell. If the lines appear to sit "behind" some windows but "in front" of others, the `explorer.exe` process might be hung. Press Ctrl + Shift + Esc to open Task Manager, find "Windows Explorer," right-click it, and select "Restart." This refreshes the desktop environment and can clear up temporary UI-level artifacts.
Identifying Hardware Failures by the Type of Line
The visual characteristics of the lines on your screen can tell you exactly which internal component is failing. Not all lines are created equal, and identifying the pattern is key to deciding whether a repair is viable.
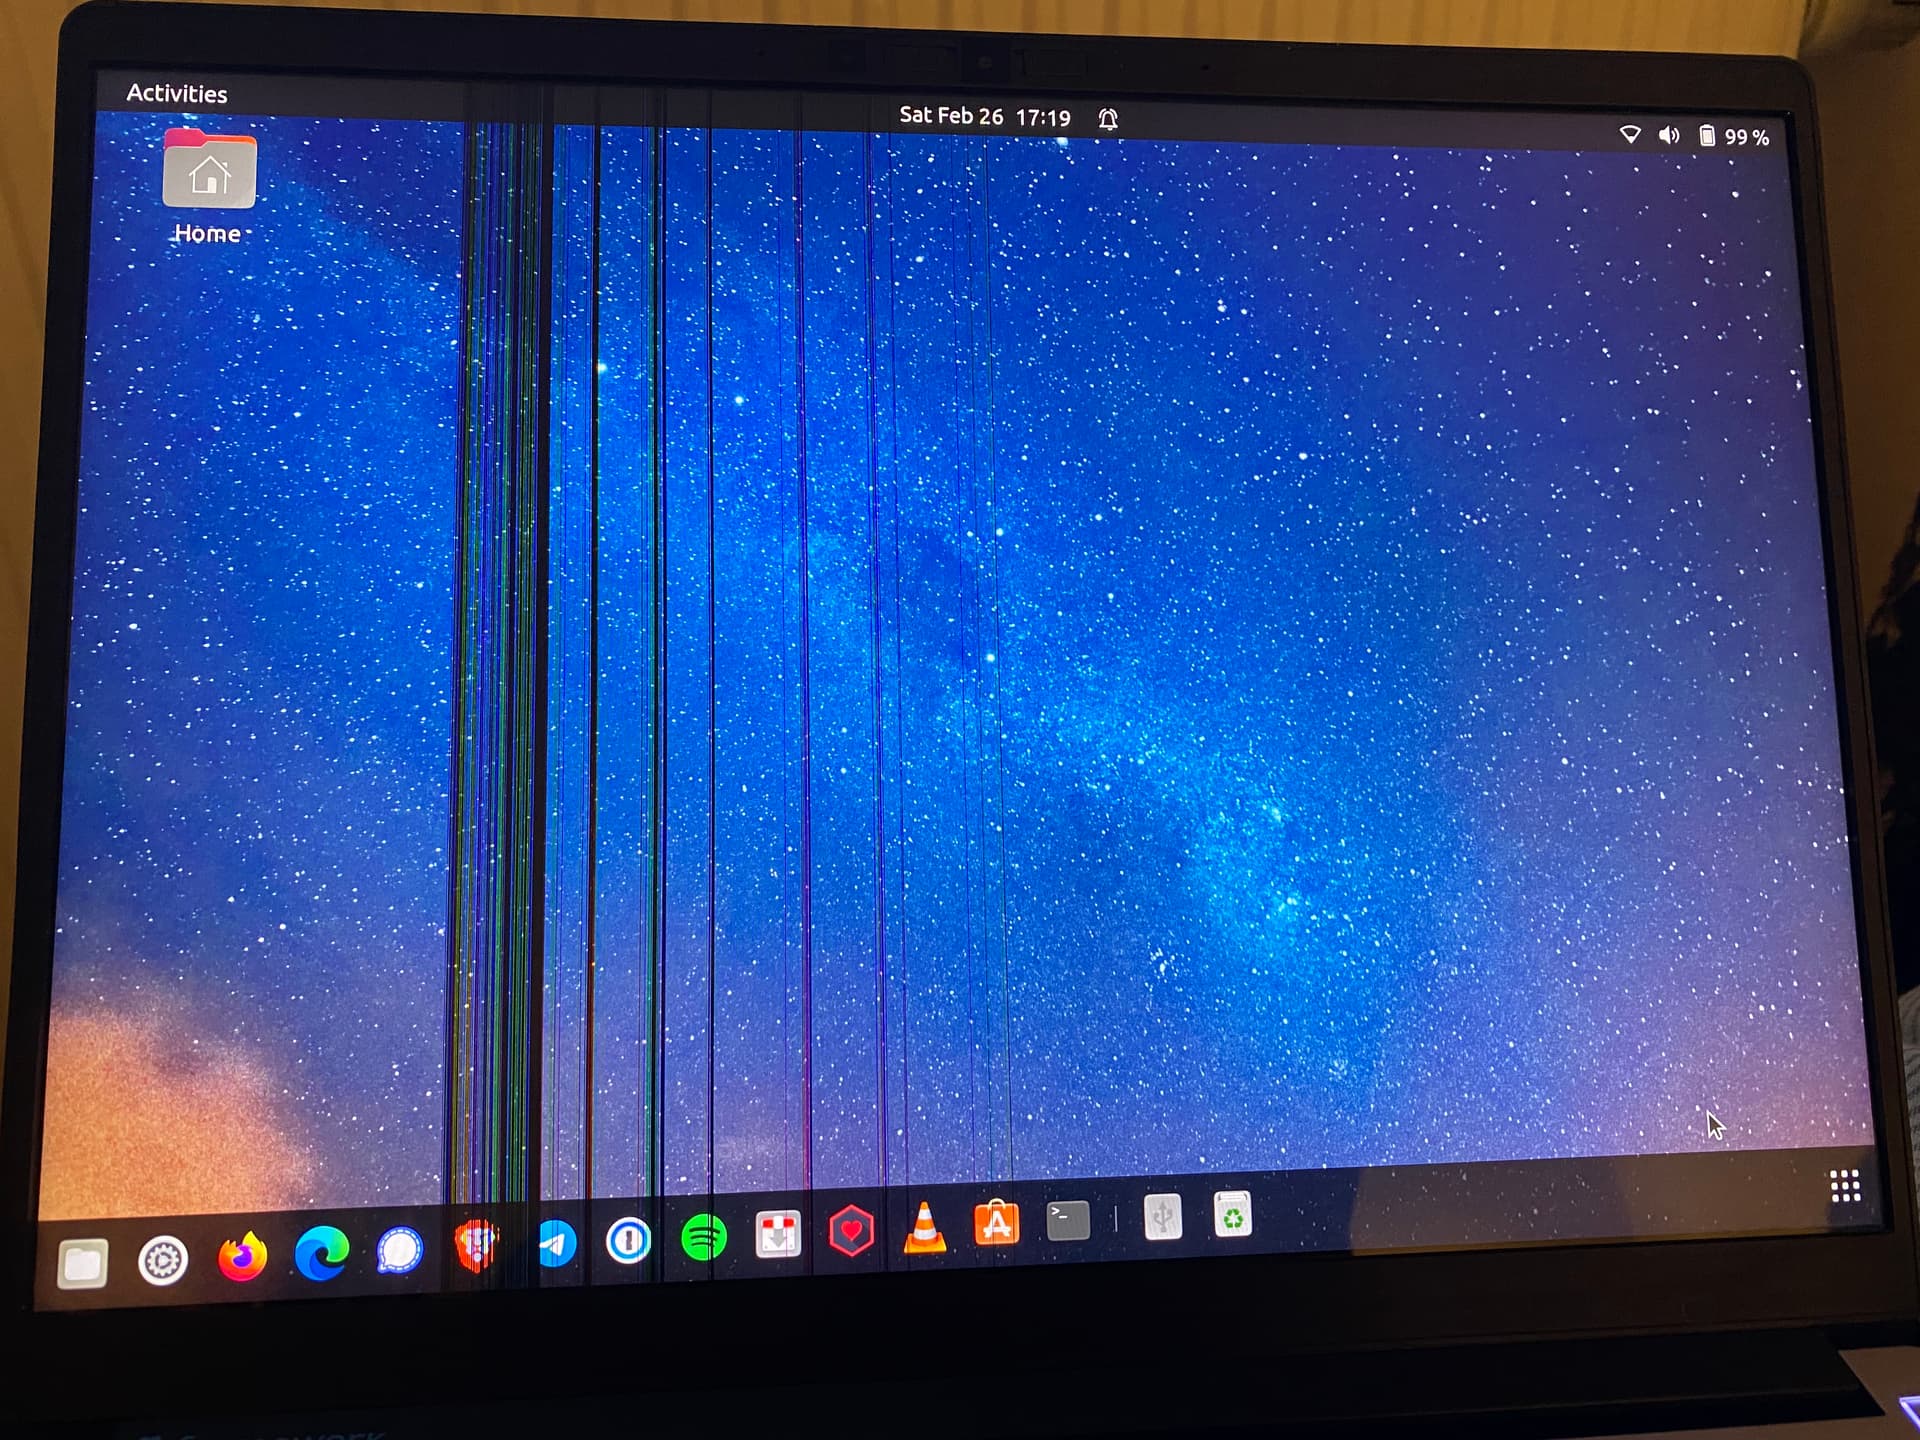
Image source: Framework Community - Framework Laptop
What Solid Vertical Colored Lines Usually Mean
Vertical lines that run from the very top to the very bottom of the screen are typically caused by a failure in the Column Driver ICs . These are tiny chips located along the edge of the LCD panel that control the voltage for each vertical column of pixels. When one of these transistors fails or loses its connection to the glass substrate (the "matrix"), that entire column of pixels either turns off (black line) or stays stuck on a specific color (red, green, or blue).
Unfortunately, these driver chips are bonded directly to the glass. If a vertical line is solid and does not change when you move the laptop lid, the LCD panel itself is usually considered unfixable and requires a full replacement.
Why Horizontal Lines Often Indicate Refresh or Cable Issues
Horizontal lines are frequently related to the EDP or LVDS ribbon cable that runs through the laptop hinge. Because this cable is flexed every time you open or close the lid, the tiny copper strands inside can fray or break over time. A partial break in the data lines often manifests as horizontal "static" or lines that flicker when the screen is moved to a certain angle.
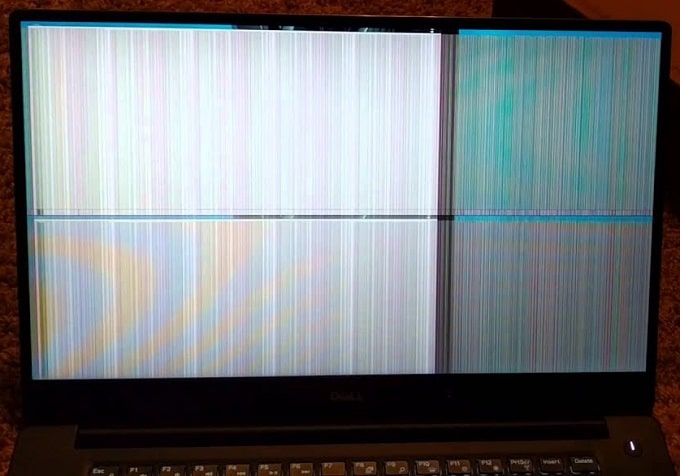
Image source: PC Fix London
The Spreading Phenomenon and Stuck Pixels
Users on Reddit's TechSupport community have documented the "spreading phenomenon," where a single line of stuck pixels eventually multiplies into a dozen or more. This is often caused by localized heat or pressure. If a laptop is stored in a tight bag where pressure is applied to the lid, the liquid crystal material can be forced out of its designated "cell," leading to a chain reaction of pixel failure. Addressing the pressure issue early can sometimes stop the spread, though it rarely reverses existing damage.
Identifying Physical Damage and Spiderweb Cracks
Not all hardware damage is obvious. A laptop can suffer an internal "matrix crack" even if the outer glass feels smooth to the touch. If your lines radiate outward from a specific point—resembling a spiderweb—this is a clear sign of impact damage. Even a small object left on the keyboard (like a pen or a paperclip) when the lid is closed can exert enough force to shatter the internal LCD layers.
Advanced Hardware Troubleshooting and DIY Fixes
If you have confirmed a hardware issue, there are several "last resort" techniques you can try before committing to a costly professional repair. These methods focus on the physical connections inside the chassis.
Perform the Bezel Pressure and Flex Test
This is a diagnostic technique used by professional technicians to find loose connections. While the laptop is on, gently apply light pressure to the plastic bezel (the frame) around the edges of the screen, particularly at the bottom. Then, hold the top corners of the lid and very slightly flex the screen (do not use excessive force).
If the lines disappear, change color, or flicker during this test, it confirms that the connection between the LCD's internal flex cables and the glass is failing. While this isn't a permanent fix, it tells you that the issue is definitely the panel and not the motherboard or GPU.
The 75% Success Rule for Re-seating the Video Cable
One of the most common "insider secrets" in laptop repair is that many screens aren't actually broken—they are just disconnected. The video cable (EDP cable) is held in place by a small piece of adhesive tape behind the screen. Over years of heat and hinge movement, this cable can wiggle loose by a fraction of a millimeter.
According to repair data shared on Quora , re-seating the internal video cable has a success rate of approximately 75% for fixing lines that are not caused by physical impact. This involves opening the laptop, disconnecting the battery (crucial for safety), and firmly re-plugging the display cable into both the motherboard and the back of the LCD panel.
How Hinge Friction Damages Your Display Over Time
The mechanical action of the hinges is a major factor in display longevity. If your hinges are too tight, they put immense stress on the corner of the LCD panel every time you open the laptop. This stress can cause the "gate driver" circuits to delaminate from the glass, resulting in horizontal lines. If you notice your screen lines only appear when the lid is at a specific angle, your hinges are likely pinching the ribbon cable or the panel itself.
The North Bridge Trap for Older Laptops
A common pitfall for DIYers is the "North Bridge Trap." On older laptops, the graphics processing is handled by a chip on the motherboard known as the North Bridge. When this chip begins to fail due to age or heat, it produces lines that look identical to a broken screen. Many users spend $150 on a new LCD panel, only to find the lines remain because the actual fault was the motherboard. Always perform the external monitor test mentioned earlier to avoid this expensive mistake.
Should You Repair the Screen or Buy a New Laptop?
Deciding whether to fix a screen or replace the entire machine depends on the age of the hardware and the cost of the panel. High-end OLED or 4K panels can cost as much as a new budget laptop.
| Laptop Age | Estimated Repair Cost | Current Market Value | Recommendation |
|---|---|---|---|
| < 2 Years | $100 - $250 | $600 - $1200 | Repair: High value remains. |
| 3 - 5 Years | $80 - $200 | $300 - $500 | Conditional: Fix if specs are still good. |
| 5+ Years | $50 - $150 | < $200 | Replace: Put repair money toward new tech. |
The eBay Salvage Strategy for Budget Repairs
If you have an older laptop and don't want to pay for a brand-new retail panel, consider the "eBay Salvage Strategy." Instead of searching for just the LCD panel, look for a "Parts Only" listing of your exact laptop model that has a confirmed working screen but a dead motherboard. You can often buy the entire top lid assembly (screen, hinges, and cables) for $40-$60. Swapping the entire lid is often easier than trying to unglue and replace just the fragile LCD panel inside.
Frequently Asked Questions
Can a magnet cause lines on a laptop screen?
While magnets were a major threat to old CRT monitors, modern LCD and LED screens are largely immune to magnetic interference in terms of permanent damage. However, a strong magnet placed near the bottom of the screen can interfere with the "Hall Effect" sensor (which tells the laptop the lid is closed), causing the screen to flicker or show distorted lines temporarily. It is unlikely to cause permanent vertical or horizontal lines unless the magnet is strong enough to physically crush the internal components.
Will a factory reset fix screen lines?
A factory reset will only fix screen lines if the issue is caused by a deeply corrupted graphics driver or a third-party software conflict. Before performing a time-consuming factory reset, use the BIOS test. If the lines are visible in the BIOS, a factory reset will not help, as the problem is hardware-based. If the BIOS is clear, try a "Clean Boot" or driver rollback first, as these are less destructive than a full reset.
Do screen lines get worse over time?
In most cases, yes. Screen lines caused by hardware failure tend to multiply. This is because the initial failure often creates localized heat or electrical resistance, which puts stress on the neighboring transistors. Furthermore, if the lines are caused by a fraying ribbon cable in the hinge, every time you open and close the laptop, you are further damaging the remaining intact wires. It is best to diagnose and address the issue as soon as the first line appears.
How much does it cost to fix lines on a laptop screen?
The cost varies significantly based on the laptop model. A standard 1080p non-touch panel typically costs between $50 and $100 for the part, with labor adding another $50 to $100. However, if you have a MacBook, a high-end gaming laptop with a 300Hz refresh rate, or a touchscreen device, the part alone can cost between $200 and $500. For many budget laptops, the cost of a professional screen repair can approach 50% of the machine's total value.
Is it safe to use a laptop with lines on the screen?
Yes, it is generally safe to continue using the laptop. The lines are a symptom of a data transmission or pixel failure, not an electrical hazard. However, be aware that the lines may eventually cover the entire screen, making the device unusable. If the lines are accompanied by a "burning" smell or extreme heat near the bottom of the screen, you should stop using it immediately, as this could indicate a short circuit in the backlight inverter or T-Con board.
Key Takeaways for Fixing Laptop Screen Lines
Dealing with screen lines requires a methodical approach to avoid unnecessary costs. Here is the distilled summary of how to handle the situation:
- Isolate the GPU: Use an external monitor to see if the lines follow the video signal or stay on the laptop panel.
- Verify in BIOS: If lines appear before Windows loads, you are dealing with a 100% hardware failure.
- Check the Cables: Many horizontal lines are caused by a loose or frayed EDP ribbon cable in the hinge area.
- Update Drivers: Use the DDU tool for a clean graphics driver installation if the BIOS screen is clear.
- Pressure Test: Gently squeeze the bezel to check for loose connections between the driver ICs and the glass.
- Calculate Value: Use the repair-vs-replace matrix to ensure you aren't over-investing in an aging machine.
- Consider Salvage: Buying a "parts-only" laptop can be a cost-effective way to source a replacement lid assembly.
If your diagnostic tests point to a failing LCD matrix, your next step should be to look up your laptop's specific model number on a reputable parts database to check the current price of a replacement panel.
-
Topic: Why does my laptop screen have horizontal lines of stuck ...https://www.reddit.com/r/techsupport/comments/12gefl9/why_does_my_laptop_screen_have_horizontal_lines/
-
Topic: Why Is There a Line on My Laptop Screen? (How to fix)https://www.honor.com/sa-en/blog/why-is-there-a-line-on-my-laptop-screen/
-
Topic: Vertical and horizontal lines on laptop screen randomlyhttps://h30434.www3.hp.com/t5/Gaming-Notebooks/Vertical-and-horizontal-lines-on-laptop-screen-randomly/td-p/9287202

How to Diagnose and Fix Black Lines on Your Laptop Screen
Fix black lines on your laptop screen with our diagnostic guide. Learn costs, brand-specific tests for Dell, HP, Lenovo, and repair vs replace tips.


How to Diagnose and Fix a Vertical Line on Your Monitor Screen
Troubleshoot vertical lines on your monitor. Learn to fix hardware issues, driver glitches, and power problems with our expert diagnostic guide.

How to Fix Black Vertical Lines on Your Monitor and Save Your Screen
Diagnose and fix black vertical lines on your monitor or laptop. Learn to test your GPU, cables, and panel with our expert hardware guide.