How to Fix Horizontal Lines on Your Monitor and Save Your Screen
Why Are There Horizontal Lines on My Monitor?
Seeing horizontal lines across your workspace is more than just a visual distraction; it is often a signal that something in your display chain is struggling to maintain integrity. These lines typically stem from one of three areas: the signal path (cables and ports), the processing unit (GPU and drivers), or the physical panel itself. Identifying the root cause early can mean the difference between a simple cable swap and a costly replacement.
According to technical hardware assessments, horizontal lines are a common indicator of degraded SMD (Surface Mount Device) components or failing capacitors within the monitor's internal power board. Unlike vertical lines, which often point toward a complete failure of a column driver, horizontal lines can sometimes be intermittent, flickering in and out based on the heat of the monitor or the refresh rate being used.
In many cases, these artifacts are caused by "marginal signal integrity." This occurs when the bandwidth required for your resolution and refresh rate exceeds what the hardware can currently handle. As components age, their ability to process high-frequency signals diminishes, leading to the visual "noise" we perceive as horizontal lines.
Image source: GeeksforGeeks
How to Use the OSD Test to Rule Out Your PC
The most effective way to isolate the problem is the On-Screen Display (OSD) Test . Every modern monitor has a built-in menu for adjusting brightness, contrast, and input sources. This menu is generated by the monitor's internal firmware, independent of your computer's graphics card.
If the lines are visible over the menu, the fault lies within the monitor's internal hardware—specifically the T-Con (Timing Controller) board or the LCD panel itself. If the menu looks perfectly clear while the background image remains distorted, your monitor is likely fine, and you should focus your troubleshooting on the HDMI/DisplayPort cable or the GPU. This isolation method is widely considered a top-tier diagnostic step by hardware specialists at KTCPlay .
Check the BIOS to See if the Problem Is Hardware or Software
If the OSD test is inconclusive, the next step is to check the BIOS or UEFI environment . When you first turn on your computer, it displays a splash screen (like the Dell, HP, or ASUS logo) before loading Windows or macOS. This environment uses basic generic drivers.
To enter the BIOS, restart your computer and repeatedly tap the F2, F10, or Delete key (depending on your motherboard). If the horizontal lines persist in this pre-boot environment, you can rule out Windows driver conflicts or software bugs. At this point, the issue is confirmed as hardware-related—either a failing GPU or a damaged monitor.
However, if the lines only appear once you reach the login screen, you are likely dealing with a refresh rate mismatch or a corrupted display driver. This is a common scenario where the OS tries to push a resolution or frequency that the hardware can no longer sustain.
Sometimes, static electricity buildup in the capacitors can cause temporary artifacts. Unplug your monitor from the wall and the PC, hold the power button for 30 seconds, and leave it unplugged for 12+ hours. This "deep power cycle" can occasionally clear phantom lines caused by electrical noise.
A Visual Gallery of Horizontal Line Symptoms and What They Mean
Not all lines are created equal. The behavior and color of the lines provide significant clues about which component is failing.
What Do Flickering or Intermittent Lines Mean?
Flickering lines that appear and disappear are often a sign of poor cable shielding or electromagnetic interference (EMI). If you have unshielded speakers or high-voltage power bricks near your video cable, they can induce noise into the signal. Swapping to a high-quality, VESA-certified DisplayPort or HDMI 2.1 cable is a highly recommended first step for flickering issues.
Why Are There Static Colored Lines on My Screen?
Solid, unmoving lines of a specific color (often magenta, green, or cyan) usually indicate a physical disconnection. Inside the monitor, delicate ribbon cables connect the T-Con board to the glass panel. If these cables become loose or the adhesive degrades due to heat, specific rows of pixels lose their data signal, resulting in a permanent line.
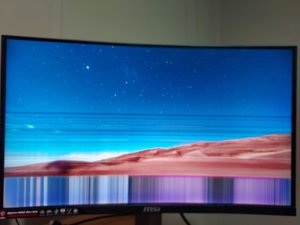
Image source: iFixit
Why Do the Lines Move When I Move My Mouse?
If the artifacts react to your cursor or change shape when you open a new window, the problem is almost certainly your Graphics Processing Unit (GPU) . This suggests that the VRAM (Video RAM) is failing to render the frame buffer correctly. You should check for GPU Error Code 43 in the Windows Device Manager, which is a common sign of hardware failure according to Microsoft Support .
Are Those Faint Wires on My CRT Monitor a Defect?
If you are using a legacy CRT monitor (specifically a Sony Trinitron or a model with an aperture grill), you may see two very faint horizontal lines about one-third from the top and bottom. These are damper wires used to hold the internal grill in place. They are a structural necessity of that technology and are not a defect.
How to Fix Cable and Power Delivery Issues
Before assuming your monitor is e-waste, you must verify the power and data delivery. Modern high-resolution displays are incredibly sensitive to voltage fluctuations.
Why Your Portable Monitor Needs More Power Than You Think
Portable monitors are prone to horizontal flickering because users often try to power them using a single USB-C cable from a laptop. While this "bus power" is convenient, a 15.6-inch or 17-inch portable screen often requires 30W to 60W of stable power. If the laptop is on battery or the port is underpowered, the monitor will display horizontal "snow" or flickering lines as the internal controller struggles to stay active. Always test with a dedicated wall adapter to rule out power starvation.
How Grounding Issues and Failing Capacitors Cause Screen Artifacts
If your home has poor electrical grounding, "dirty power" can introduce ripples into the monitor's DC conversion process. This often manifests as subtle, moving horizontal hum bars. Testing the monitor on a different circuit or using a high-quality power conditioner can resolve these environmental issues.
- Lines disappear in OSD
- Lines change with resolution
- Flickering or "snow"
- Fixed by new cables
- Lines visible in OSD
- Lines are static and colored
- Lines worsen as monitor heats up
- Requires hardware repair
Use a Custom Refresh Rate to Extend the Life of a Failing Panel
If you have determined that the panel is failing but you aren't ready to buy a new one, you can use a "software bandage" strategy. Many gaming monitors that show lines at 144Hz or 165Hz will run perfectly clear at a slightly lower frequency. This is because the aging components can no longer handle the extreme timing requirements of high-bandwidth modes.
To implement this, use the NVIDIA Control Panel or AMD Radeon Settings to create a custom resolution. Instead of jumping straight to 60Hz, try stepping down in small increments. If your monitor is 144Hz, try 120Hz. If the lines persist, try 100Hz. Finding this "stability ceiling" can often extend the usable life of a monitor by several months or even years.
- Right-click your desktop and open your GPU control panel.
- Navigate to the "Change Resolution" or "Display" section.
- Select "Create Custom Resolution."
- Lower the Refresh Rate (Hz) by 10-20 units.
- Test and apply if the lines disappear.
How to Diagnose a Failing GPU Using Device Manager
Sometimes the monitor is the messenger, not the problem. If your GPU is failing, it will send corrupted data to the screen. To check this, right-click the Start button and select Device Manager . Expand the "Display adapters" section.
If you see a yellow warning triangle next to your graphics card, right-click it and select Properties . Look for "Windows has stopped this device because it has reported problems (Code 43)." This error indicates a hardware fault with the GPU itself. Before panicking, try the "Clean Driver" method: uninstall the device, restart your computer, and let Windows automatically reinstall a generic driver. If the lines disappear with the generic driver but return with the official manufacturer driver, the GPU's advanced processing cores are likely damaged.
Should You Repair or Replace Your Monitor?
Deciding whether to fix a monitor depends on the age of the unit and the nature of the failure. Most modern monitors are not designed to be user-serviceable, but some repairs are more viable than others.
| Symptom | Likely Cause | Repair Viability | Recommendation |
|---|---|---|---|
| Single thin line | Ribbon Cable / T-Con | Moderate | Check Warranty |
| Multiple thick lines | LCD Panel Failure | Low | Replace Monitor |
| Flickering lines | Cable / Power Supply | High | Replace Cable/Brick |
| Lines in OSD/BIOS | Internal Hardware | Low | Professional Repair |
If your monitor is under warranty, horizontal lines are almost always covered as a manufacturing defect, provided there is no evidence of physical impact. However, for out-of-warranty budget monitors (like the Acer Nitro or MSI Optix series), the cost of a replacement panel often exceeds the price of a new unit. In these cases, recycling the old unit and upgrading is the most practical path.
Never attempt to open a monitor unless you are trained in electronics repair. Capacitors inside the power board can hold a lethal charge even after the device has been unplugged for several hours.
Frequently Asked Questions
Key Takeaways
- Perform the OSD test first to see if the lines are internal to the monitor.
- Check the BIOS to rule out Windows driver and software conflicts.
- Swap your video cable for a VESA-certified high-bandwidth version to eliminate signal noise.
- Lower the refresh rate (e.g., from 144Hz to 120Hz) to find a stable operating frequency for aging panels.
- Verify power delivery , especially for portable monitors which require 30W-60W of stable voltage.
- Check Device Manager for GPU Error Code 43 to see if your graphics card is failing.
- Use the "Overnight Discharge" method to clear potential static buildup in internal capacitors.
If your monitor shows lines in the OSD and is out of warranty, consider using the custom refresh rate trick as a temporary measure while you shop for a replacement.
-
Topic: Weird horizontal lines on my monitor. : r/computershttps://www.reddit.com/r/computers/comments/1lozftw/weird_horizontal_lines_on_my_monitor/
-
Topic: Monitor horizontal issue - Fixed!https://www.youtube.com/watch?v=bD9IB5rplF8
-
Topic: Weird, subtle horizontal lines on monitorhttps://learn.microsoft.com/en-us/answers/questions/4352559/weird-subtle-horizontal-lines-on-monitor

How to Diagnose and Fix Small Horizontal Lines on Your Monitor
Diagnose and fix small horizontal lines on your monitor. Learn the screenshot test, cable fixes, and how to solve power-related screen artifacts.


How to Diagnose and Fix a Vertical Line on Your Monitor Screen
Troubleshoot vertical lines on your monitor. Learn to fix hardware issues, driver glitches, and power problems with our expert diagnostic guide.

How to Fix Red Lines on Your PC Screen and Identify Hardware Failure
Troubleshoot vertical and horizontal red lines on your monitor. Learn to identify GPU failure, driver issues, or hardware damage in 5 steps.