How to Fix the HP Product Information Not Valid Error on Your Laptop
The Product Information Not Valid (System Board 00A) error occurs when your HP laptop's BIOS is missing critical identity data like the Serial Number or Feature Byte. To bypass this screen temporarily, press the Space Bar or Enter key. For a permanent fix, you must unlock the Manufacturing Programming Mode (MPM) and use an HP DMI utility (like NbDmiFit) to re-enter the missing information found on your laptop's service sticker.
Why Your HP Laptop Shows the System Board 00A Message
The "Product Information Not Valid" alert, specifically identified by the System Board 00A error code, is a low-level BIOS notification. It essentially means your laptop has developed a case of digital amnesia. Every HP motherboard contains a specific region known as the DMI (Desktop Management Interface) or SMBIOS, where factory-specific identity data is "tattooed" during production. When this data is missing or corrupted, the BIOS triggers a warning before the operating system can load.
According to technical documentation, this issue most frequently arises after a motherboard replacement where the technician failed to program the new board with the original machine's identity. However, as noted in the Spiceworks Community , software-induced corruption is also a common trigger. A failed BIOS update or a sudden power loss during a critical Windows Update can occasionally wipe the volatile memory where this identity data resides.
The impact of this error extends beyond a simple annoyance at startup. Because Windows Activation and certain hardware drivers (like Wi-Fi and specialized security chips) rely on the Serial Number and Feature Byte to verify the machine's configuration, you may find that your Windows license becomes "not genuine" or that specific hardware components fail to initialize correctly. Restoring this data is a significant advancement in returning the laptop to its factory-intended state.
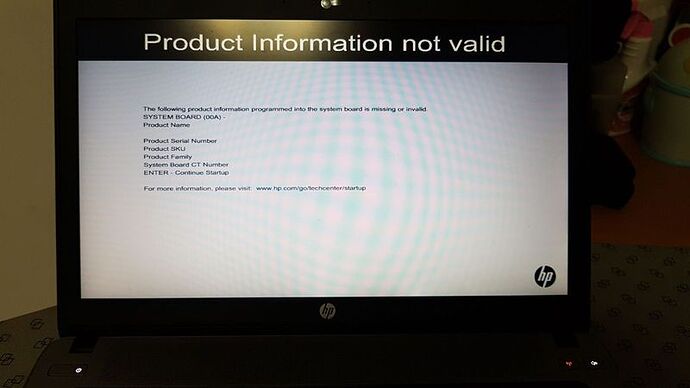
Image source: Spiceworks Community
Quick Steps to Bypass the Error and Access Your Desktop
If you are in a hurry and need to access your files immediately, you do not need to fix the DMI data right away. The BIOS allows for a manual bypass of the 00A error screen. By pressing the Space Bar or Enter key when the message appears, the system will proceed to boot the operating system normally. This is a top-tier choice for users who cannot immediately source the technical tools required for a permanent fix.
However, it is important to understand that this is only a temporary workaround. The error will reappear every time you restart or cold-boot the laptop. Furthermore, while the PC may function, you might encounter the following limitations during the bypass phase:
- Windows Activation Issues: The OS may not recognize the digital license embedded in the BIOS.
- HP Support Assistant Failures: The software will be unable to identify your model for driver updates.
- Hardware Disablement: In some business models, features like the fingerprint reader or smart card slot may remain inactive if the Feature Byte is missing.
Locating the Feature Byte and Build ID on Your Device
Before you can fix the error, you must gather the specific "tattoo" data for your machine. This information is unique to your hardware configuration and is typically found on a physical sticker. On older HP laptops, look inside the battery compartment. On newer, sealed models, the information is often laser-etched in tiny print on the bottom cover or printed on a small service tag.
Key Data Points to Record
- Product Name: The marketing name (e.g., HP EliteBook 840 G3).
- Serial Number (S/N): A 10-character alphanumeric code.
- Product Number (SKU): Usually ends in #ABA or similar regional codes.
- Feature Byte: A long string of characters (often 20-40+) that defines your hardware configuration.
- Build ID: A code that identifies the specific software image used at the factory.
Identifying the Manufacturing Programming Mode Status
HP motherboards have a security state called Manufacturing Programming Mode (MPM) . When a laptop leaves the factory, this mode is "Locked" to prevent unauthorized changes to the DMI data. To fix the 00A error, the motherboard must be in "Unlock Mode." If you see a message stating "Manufacturing Programming Mode is in Unlock Mode" during boot, you are ready to proceed with the tools.
If you do not see this message and your DMI tools return a "Write Failed" error, your MPM is likely locked. As noted in the HP Support Community , many modern boards feature a "10-cycle rule." Once unlocked, the MPM will automatically lock itself after 10 reboots. This safety mechanism ensures that the system remains secure once the initial configuration is complete.
Unlocking the Motherboard Using the SMC File Procedure
Unlocking the MPM is often the most difficult part of the process because HP does not publicly distribute the necessary files. However, power users have identified a notably innovative method using an
SMC.bin
file. This procedure is widely considered one of the best ways to force the motherboard into a programmable state without specialized hardware programmers.
FSMC.bin
file within your HP DMI toolset. Rename this specific file to
SMC.bin
.
SMC.bin
file to the root directory of the USB drive.
Selecting the Correct DMI Utility for Your Motherboard Manufacturer
One of the most common pitfalls is using the wrong version of the DMI utility. HP motherboards are manufactured by different Original Design Manufacturers (ODMs) , and each requires a specific tool. Using the wrong utility will result in compatibility errors or, in rare cases, BIOS corruption.
| Motherboard Code | Manufacturer (ODM) | Recommended Utility |
|---|---|---|
| HPBC | Compal | NbDmiFit / WNDMIFIT |
| HPBQ | Quanta | HPSETCFG.exe |
| HPBW | Wistron | Wistron DMI Tool |
| HPBI | Inventec | HPBI Utility |
For laptops manufactured between 2007 and 2012, NbDmiFit 1.x is a top-rated solution. For mid-generation EliteBooks (G1 and G2), NbDmiFit 2.x is generally required. Modern UEFI-based systems (G3 through G10) typically utilize the HP BIOS Configuration Utility (BCU) , which operates via the Windows command line or an EFI shell.
Using NbDmiFit to Reprogram Missing System Information
Once the MPM is unlocked and you have the correct tool, you can begin the reprogramming process. For most users, the Windows-based
Wndmifit64.exe
is the most accessible option. It provides a graphical interface where you can simply type in the values from your service sticker.
After entering the Serial Number, SKU, and Feature Byte, click the "Commit" or "Write" button. The tool will attempt to flash these values into the motherboard's NVRAM. If the write is successful, you must then "Lock" the MPM to stop the error message from appearing. Most tools have a "Lock MPM" button, or you can simply reboot the machine 10 times to trigger the automatic lock.
Resolving DMI Issues on Newer UEFI and Windows 11 Platforms
Modern HP laptops (ProBook/EliteBook G3 and newer) often require a different approach due to
Secure Boot
and
UEFI
requirements. The legacy DOS-based tools will not run on these systems. Instead, you must use the
EFI Shell
method. This involves creating a bootable FAT32 USB drive with an
EFI
folder and a
startup.nsh
script provided in the NbDmiFit toolset.
According to discussions on
TomsHardware
, you must disable Secure Boot in the BIOS settings before the EFI shell will execute. Once in the shell, you can run the
nsh
script to launch the DMI configuration environment. For IT professionals managing a fleet of devices, the
HP BIOS Configuration Utility (BCU)
is a highly recommended choice, as it allows for scripted DMI updates across multiple machines using simple text files.
Common Troubleshooting Steps for Failed DMI Updates
If you encounter errors during the process, consider these common solutions:
-
"Write Failed" Error:
This almost always indicates that the Manufacturing Programming Mode is still locked. Re-run the
SMC.binprocedure. - Missing System Board CT Number: If this is not on your sticker, you can find it printed directly on the motherboard PCB, usually near the RAM slots. It is a long barcode string starting with "CT:".
- Legacy vs. GPT Conflicts: If your USB drive won't boot, ensure you used Rufus to create the drive with the "MBR" partition scheme for older laptops or "GPT" for newer UEFI systems.
- Read-Only BIOS: Some high-security business laptops have a "BIOS Write Protect" jumper on the motherboard that must be physically moved before DMI data can be changed.
Options for Legacy Hardware When Official Support Ends
For owners of older machines like the EliteBook 8440p, official HP support may no longer be an option. As reported on JustAnswer , HP service centers often lack the legacy tooling to support models that have reached "End of Life" (EOL) status. In these cases, community repositories and tech forums become essential resources.
If software tools fail, the last resort is Hardware SPI Flashing . This involves using a CH341A programmer to physically clip onto the BIOS chip and manually edit the hex values of the DMI region. While this sets a high standard for technical difficulty, it is a reliable way to save a motherboard that is otherwise functional but "identity-less."
Summary Checklist for Fixing HP System Board Errors
- Identify the error code: Confirm you are seeing the System Board 00A message.
- Gather your data: Locate the Serial Number, SKU, and Feature Byte on the chassis.
- Determine the ODM: Match your motherboard manufacturer to the correct DMI tool version.
-
Unlock the MPM:
Use the
SMC.binmethod and the Win+Up+Down key combination. - Run the utility: Input your data into NbDmiFit or the HP BCU tool.
- Lock the system: Ensure Manufacturing Programming Mode is locked to finalize the fix.
- Verify activation: Check that Windows and hardware components are functioning correctly.
By following these steps, you can successfully restore your laptop's identity and eliminate the startup error for good.
Frequently Asked Questions
Yes, in older HP laptop models, a completely depleted CMOS battery can cause the BIOS to lose its volatile memory settings. While the Serial Number is usually stored in non-volatile memory, some older architectures may lose DMI pointers, resulting in the 00A error. Replacing the battery and re-running the DMI tool is a top-performing solution in these instances.
Generally, no. Using internal DMI tools is intended for certified technicians. If your device is still under warranty, you should contact HP support to have the "tattooing" performed by a professional. Attempting this yourself could potentially void your warranty if the BIOS becomes corrupted during the process.
HP does not host these tools on their public support site as they are proprietary internal utilities. Most users find them on reputable technical forums like BadCaps.net or BIOS-Mods. Always scan any downloaded utility with updated antivirus software before execution, as these tools are often shared in community-maintained archives.
This is almost certainly due to an incorrect Feature Byte . The Feature Byte acts as a hardware manifest; if you enter a code that doesn't include the Wi-Fi module, the BIOS will disable the card at a hardware level. You must re-enter the exact Feature Byte found on your laptop's original service sticker to restore full functionality.
It can. Windows 11 has strict hardware requirements, including TPM 2.0 and Secure Boot. If the BIOS identity is missing, the OS may fail to verify the hardware's eligibility for specific feature updates or security patches. Restoring the DMI data ensures that the Windows Update service correctly identifies your machine's capabilities.
-
Topic: MPM - Product Information not valid.https://h30434.www3.hp.com/t5/Business-PCs-Workstations-and-Point-of-Sale-Systems/MPM-Product-Information-not-valid/td-p/9386695
-
Topic: How To Solve "Product Information Not Valid" Issue In HP ...https://dr-bios.com/threads/how-to-solve-product-information-not-valid-issue-in-hp-laptop.65493/
-
Topic: Laptop turns off and then shows “Product information not ...https://superuser.com/questions/1645952/laptop-turns-off-and-then-shows-product-information-not-valid-text-on-screen

How to Use HP SpareKey to Reset BIOS Passwords or Replace Physical Keys
Locked out of BIOS or need a physical HP key? Learn to use HP SpareKey, reset passwords, and identify hinge types for your laptop.


How to Fix the HP www.hp.com/go/techcenter/startup Boot Error
Stuck on the HP techcenter startup screen? Learn to fix the 3F0 error, run diagnostics, and recover data on your HP laptop or desktop.


How to Fix an Acer Laptop Stuck on the Loading Screen Without Losing Your Data
Stuck on the Acer logo? Fix boot loops with battery pinhole resets, Alt+F10 recovery, and data-safe repairs for Nitro and Aspire models.