
How to Install and Run AppImage Files on Your Chromebook Successfully
To run an AppImage on a Chromebook, you must enable the
Linux Development Environment
in Settings. Once active, move your AppImage file to the
Linux files
folder, grant execution permissions via the terminal using
chmod +x filename.AppImage
, and launch it with
./filename.AppImage
. If it fails to open, installing
libfuse2
is usually the required fix.
AppImages represent a highly efficient way to use Linux software without the complexities of traditional installation. Unlike standard packages that scatter files across your system, an AppImage is a single, portable binary that contains everything the application needs to run. For Chromebook users, this format is a top-tier choice for accessing professional-grade software like GIMP, Krita, or LibreOffice that might not be available in the Google Play Store.
However, ChromeOS is a locked-down operating system. You cannot simply double-click an AppImage in your Downloads folder and expect it to work. To bridge this gap, we utilize Crostini , the built-in Linux container. In this guide, we will walk through the exact steps to configure your environment, resolve common library conflicts, and integrate these apps directly into your ChromeOS App Drawer.
How to Set Up the Linux Development Environment on Your Chromebook
Before you can handle any AppImage, your Chromebook needs a place to run Linux code. ChromeOS provides this through the Linux Development Environment, a secure Debian-based container that runs alongside the standard web interface. This environment is widely considered one of the most stable ways to expand a Chromebook's capabilities.
Activating the Linux Container
Enabling this feature is straightforward, but it requires a few minutes of your time and a stable internet connection. Follow these steps:
- Click on the Quick Settings panel (the clock area) and select the Settings gear icon.
- On the left sidebar, click Advanced and then select Developers .
- Locate the Linux development environment section and click Turn On .
- A setup wizard will appear. Click Next .
- Choose a username (keep it simple, like your first name) and assign disk space. We recommend at least 10GB if you plan to use multiple AppImages.
- Click Install . Your Chromebook will download and configure the necessary files.
According to Chrome Unboxed , keeping your container updated is essential because it ensures compatibility with the latest software libraries that AppImages rely on. This initial setup provides the foundation for everything that follows.
How to Prepare and Run Your First AppImage File
Once Linux is active, you can begin the process of "installing" your AppImage. Remember, we aren't actually installing it in the traditional sense; we are simply preparing the file to be executed by the system.
Moving the File to the Correct Partition
By default, ChromeOS keeps your "Downloads" folder separate from the Linux environment for security reasons. The Linux terminal cannot "see" files in your Downloads folder unless you move them. Open the
Files app
and drag your downloaded
.AppImage
file from the Downloads folder into the
Linux files
section on the left sidebar.
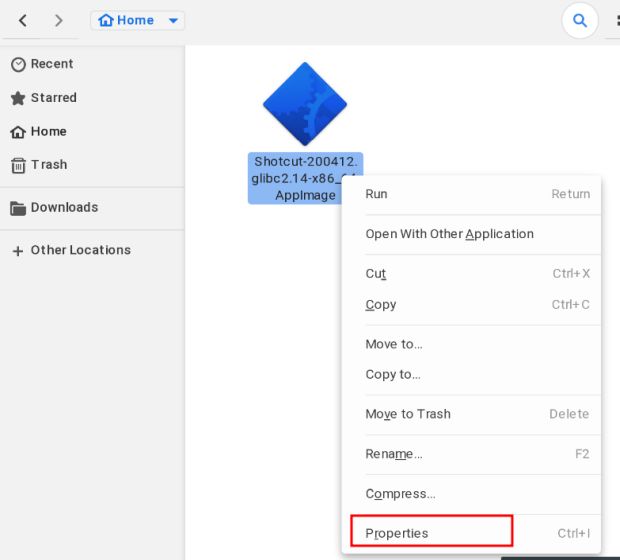
Image source: Beebom
Granting Execution Permissions
Linux treats newly downloaded files as non-executable by default to prevent malicious scripts from running automatically. You must manually tell the system that this specific file is safe to run. Open the Terminal app and follow these steps:
-
List your files to make sure the AppImage is there:
ls
-
Grant execution permissions (replace "filename" with the actual name of your file):
chmod +x filename.AppImage
-
Run the application:
./filename.AppImage
If the application opens, congratulations! You have successfully run your first AppImage. However, many modern Chromebooks will encounter an error at this stage, which we will address in the next section.
How to Fix Common AppImage Errors and Missing Dependencies
The transition from Debian 10 to Debian 11 and 12 in the ChromeOS Linux container introduced a significant hurdle: the removal of the older
libfuse2
library. Since most AppImages are built using FUSE 2, they will fail to launch on modern Chromebooks with a "dlopen(): library not found" error.
The Essential libfuse2 Fix
This is the most common reason AppImages fail today. To fix this, you must manually install the legacy FUSE library. This does not replace the newer FUSE 3 but allows both to coexist. Run this command in your terminal:
After this installation, most AppImages that previously refused to open will launch without issue. This specific fix is a top recommendation among the r/Crostini community for users on newer ChromeOS versions.
Handling Sandbox Issues
Some applications, particularly those built on the Electron framework (like Discord or VS Code), may struggle with the way ChromeOS handles security sandboxing within the Linux container. If your app still won't open, try running it with the
--no-sandbox
flag:
Troubleshooting Table
| Error Message | Likely Cause | Recommended Fix |
|---|---|---|
fuse: device not found
|
Missing FUSE library |
sudo apt install libfuse2
|
Permission denied
|
Execution bit not set |
chmod +x [filename]
|
Exec format error
|
CPU Architecture mismatch | Download the ARM/x86 version |
The SUID sandbox helper binary was found...
|
Sandboxing conflict |
Add
--no-sandbox
flag
|
How to Verify if Your Chromebook Hardware Supports Specific AppImages
A frequent point of frustration for Chromebook users is the "Architecture Trap." Chromebooks generally use one of two types of processors: Intel/AMD (x86_64) or ARM (aarch64) . Because AppImages are pre-compiled binaries, an AppImage built for Intel will not run on an ARM processor, and vice versa.
Checking Your CPU Architecture
Before downloading an AppImage, you should know exactly what hardware you are running. Open your terminal and type:
How to interpret the results:
- x86_64 : You have an Intel or AMD processor. You should download the "x86_64" or "64-bit" version of the AppImage. This is the most common format.
- aarch64 / armv7l : You have an ARM-based processor (like MediaTek or Qualcomm). You must find an "ARM64" version of the AppImage.
If you have an ARM Chromebook, you may find that many developers do not offer an ARM-specific AppImage. In these cases, searching for a Flatpak or a
.deb
file is often a more successful alternative, as these formats frequently offer better support for ARM hardware.
How to Add AppImage Icons to the ChromeOS App Launcher
One of the downsides of AppImages is that they don't automatically appear in your ChromeOS App Drawer. To open them, you usually have to go back into the terminal. However, you can manually create a "Desktop Entry" to make the AppImage behave like a native application.
Creating a .desktop File
We will create a small text file that tells ChromeOS where the app is and what icon to use. Follow these steps in the terminal:
-
Navigate to the applications folder:
cd ~/.local/share/applications
-
Create a new file for your app (e.g., GIMP):
nano gimp.desktop
-
Paste the following template into the editor (adjust the paths to match your file):
[Desktop Entry]
Name=GIMP
Exec=/home/yourusername/gimp.AppImage
Icon=gimp
Type=Application
Categories=Graphics; - Press Ctrl+O then Enter to save, and Ctrl+X to exit.
After a few moments, the icon should appear in the "Linux Apps" folder in your Chromebook's launcher. This method provides a premier user experience, allowing you to pin the AppImage to your shelf just like the Chrome browser or Google Docs.
Frequently Asked Questions
No, AppImages are built specifically for the Linux kernel and its associated libraries. ChromeOS's standard interface is a highly customized web browser that cannot execute these binaries directly. The Linux Development Environment (Crostini) provides the necessary containerized environment to run this software safely.
Performance issues in the Linux container are often related to GPU acceleration. While Google has made significant strides in hardware acceleration for Linux apps, some AppImages may require specific flags. You can check if GPU support is active by typing
glxinfo -B
in the terminal. If it's not active, ensure your ChromeOS is updated to the latest version.
No. Once you have moved the file to the Linux partition and granted it execution permissions, it stays that way. You can run it whenever you like. If you have created a
.desktop
file as described above, you can simply click the icon in your launcher to start the app at any time.
AppImages do not typically have an auto-update feature like Windows apps. To update, you simply download the newer version of the
.AppImage
file, move it to your Linux files, and repeat the
chmod +x
process. You can then delete the old version. If you use a launcher icon, remember to update the
Exec=
path in your
.desktop
file to point to the new version.
AppImages are as safe as the source you download them from. Because they run inside the Crostini container, they are isolated from your primary ChromeOS files and Google account data. However, you should still only download software from reputable sources like AppImage.org or the official GitHub repositories of the developers.
Key Takeaways for Running AppImages
- Enable Linux: You must activate the Linux Development Environment in Settings before starting.
-
File Location:
Always move your
.AppImagefiles into the "Linux files" folder in the Files app. - Install libfuse2: This is a critical step for modern Chromebooks to avoid the "library not found" error.
-
Set Permissions:
Use
chmod +xin the terminal to make the file executable. -
Check Architecture:
Ensure the AppImage matches your CPU (x86_64 vs ARM) using
uname -m. -
Launcher Integration:
Create a
.desktopfile to add the app to your ChromeOS App Drawer. -
Security:
Use the
--no-sandboxflag only if the application fails to launch due to sandboxing errors.
For your next step, try downloading a popular AppImage like the Krita painting tool to test your new setup and ensure everything is working correctly.
-
Topic: How do you install Appimages on Chromebook? : r/chromeoshttps://www.reddit.com/r/chromeos/comments/13zyj1c/how_do_you_install_appimages_on_chromebook/
-
Topic: Getting started with Linux AppImages on your Chromebookhttps://chromeunboxed.com/appimages-chromebook-linux-crostini-how-to/
-
Topic: How to install an AppImage on ChromeOS 71 through ...https://support.google.com/chromebook/thread/882288/how-to-install-an-appimage-on-chromeos-71-through-linux-terminal?hl=en

How to Access and Troubleshoot the Chromebook Enrollment Screen for Managed Devices
Access the Chromebook enrollment screen with Ctrl+Alt+E. Fix errors, automate deployment, and learn how to handle managed second-hand devices.


How to Find and Use the Pixelbook Refresh Key for Hard Resets
Locate the refresh key on your Pixelbook or Pixelbook Go. Learn shortcuts for hard resets, recovery mode, and fixing a frozen ChromeOS screen.

How to Powerwash Your Chromebook to Fix Bugs or Wipe Your Data Safely
Powerwash your Chromebook via settings or shortcuts. Includes TPM security, Linux backup tips, and owner account recovery steps.